Showing posts with label unity. Show all posts

Tuesday, March 5, 2019

Patrolling Enemy Tutorial


One of the most-requested features I get asked about in the Game Design classes I teach is how to make a patrolling enemy that will "spot" the player. I've been making a lot of video tutorials lately, but for this one I've decided to make a text tutorial. So here it is, how to set up a basic patrolling enemy that will "spot" the player.


Patrolling Enemy
Download Enemy Character and Animations from Mixamo
  1. Log in or sign up
  2. From the Characters tab, select a character you like
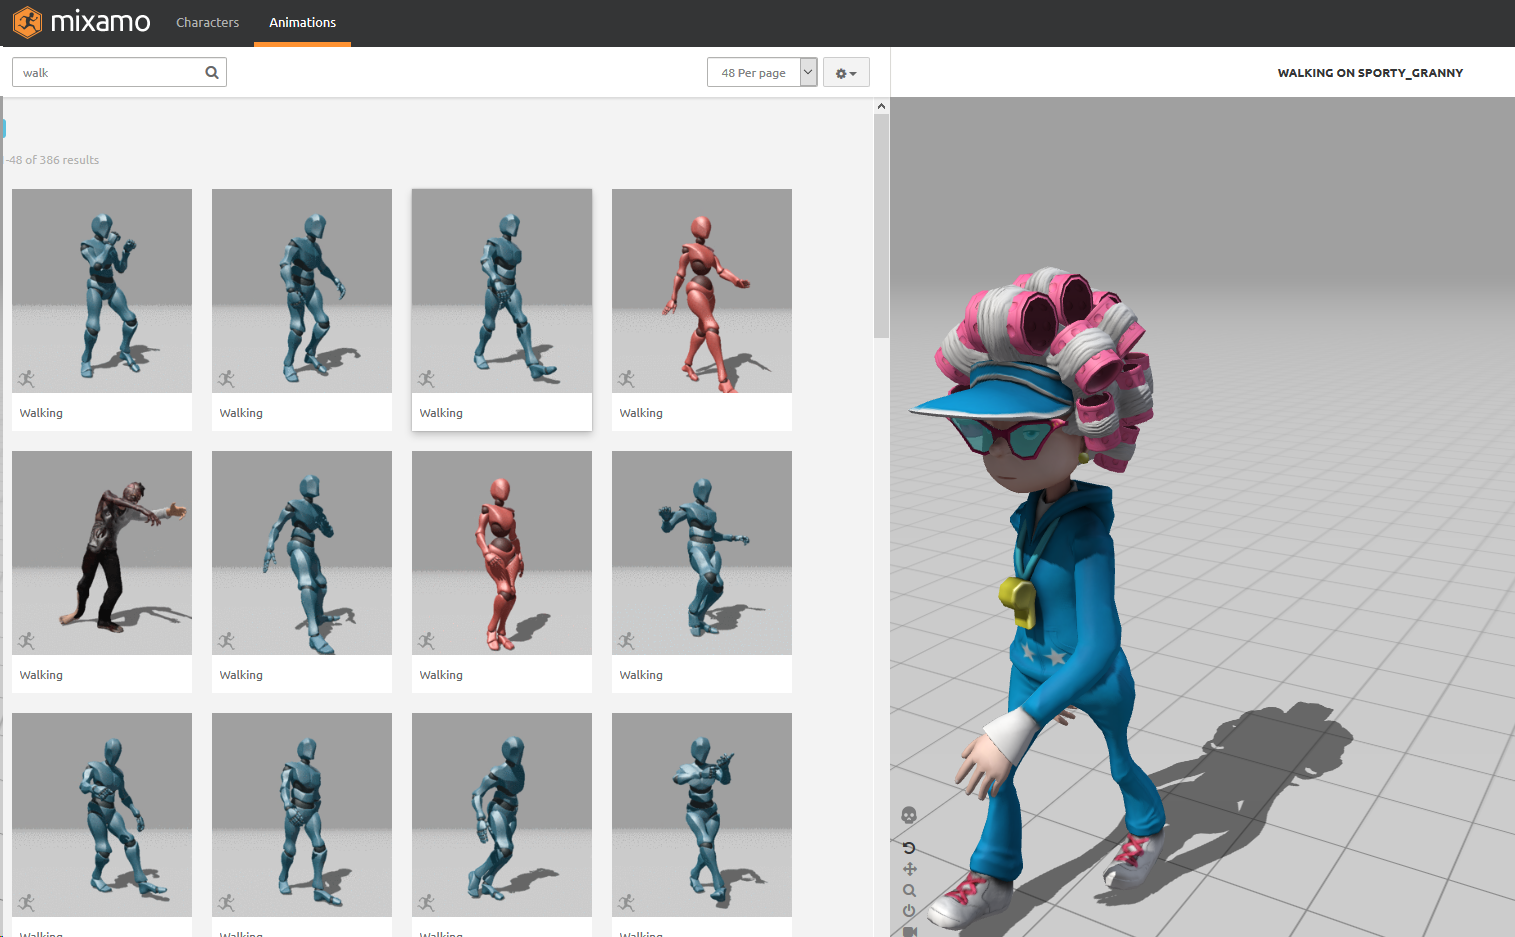
  3. From the Animations tab, select a walk cycle
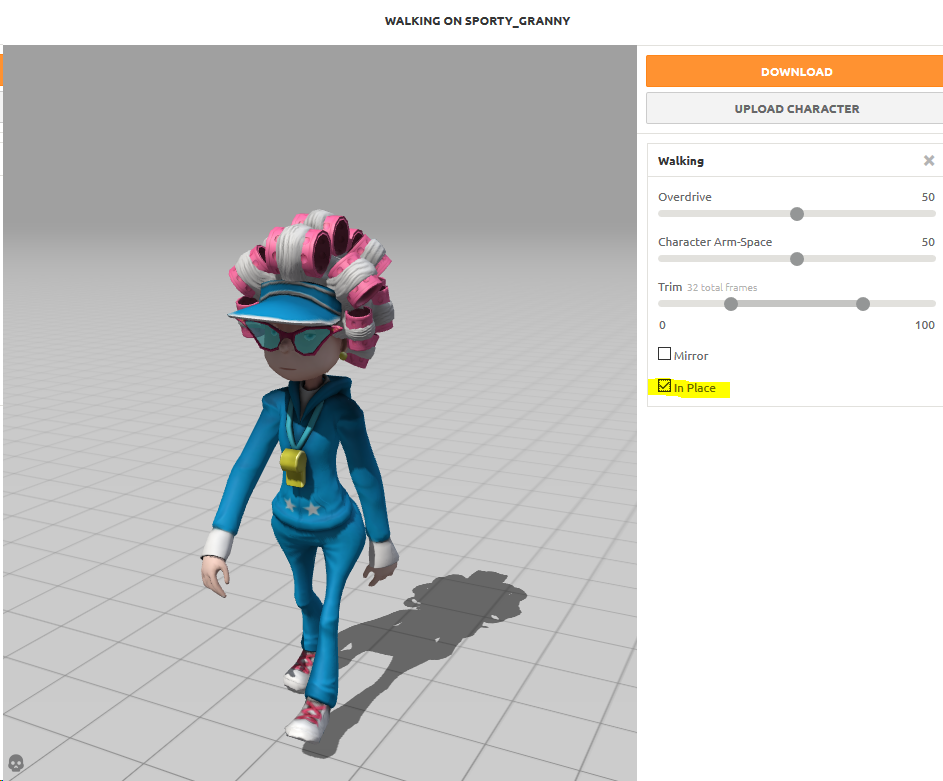
  4. Check the box for In Place
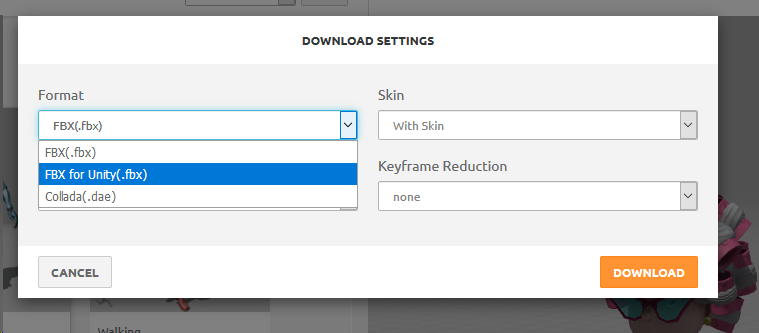
  5. Download as FBX for Unity
  6. Download a second time for Collada, which gives a .zip folder with the texture files
  7. Find a second animation, such as an Attack, and download as FBX for Unity
  8. Import the FBX and the texture files to Unity
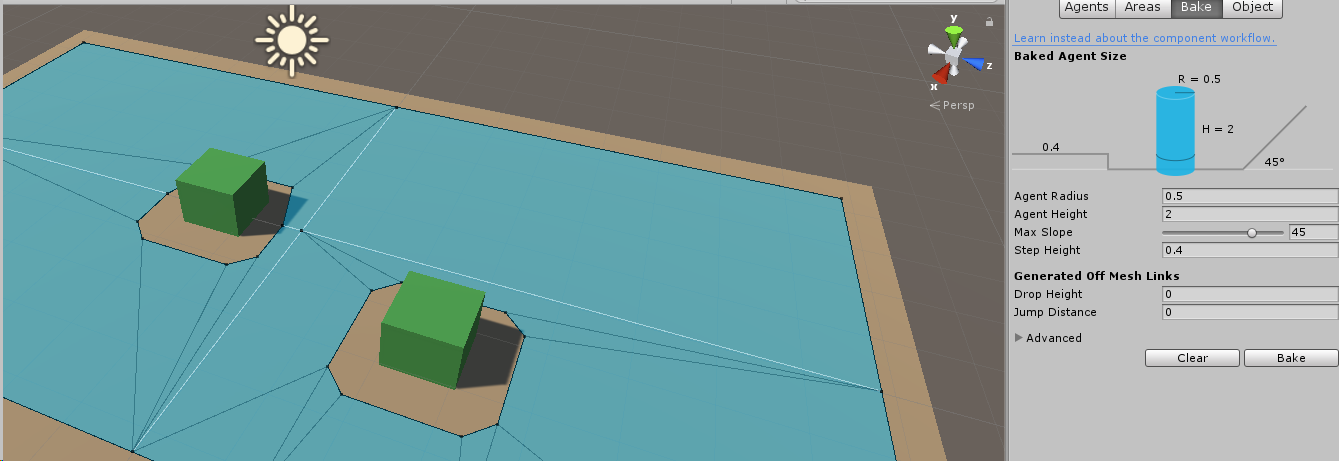
Setup and Bake NavMesh in Unity
  1. Create a Ground Plane in a new empty scene
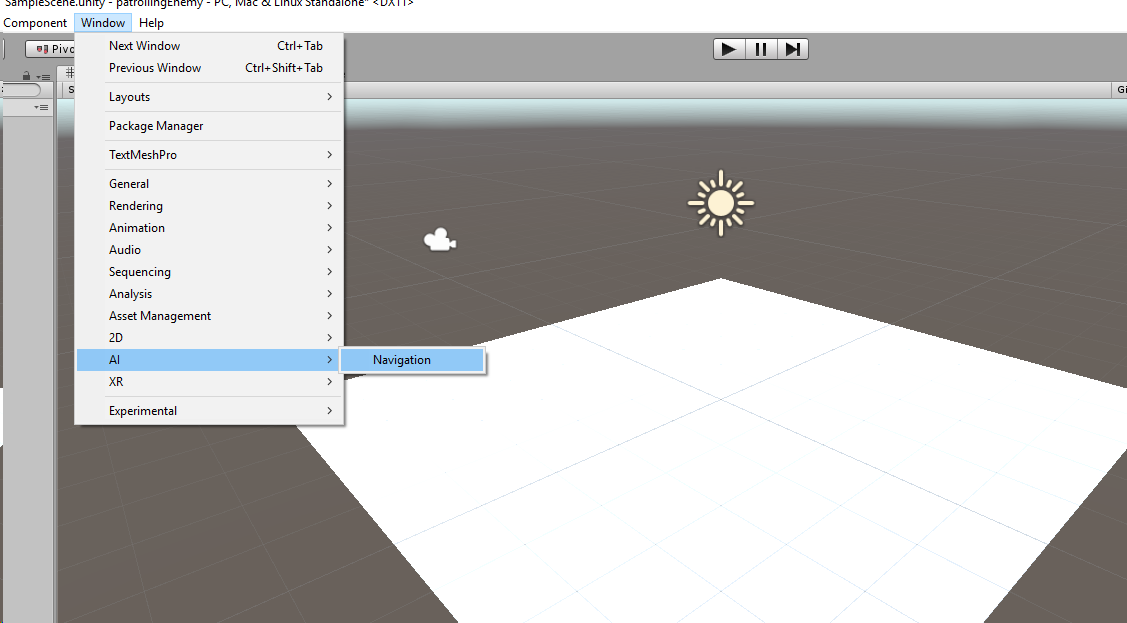
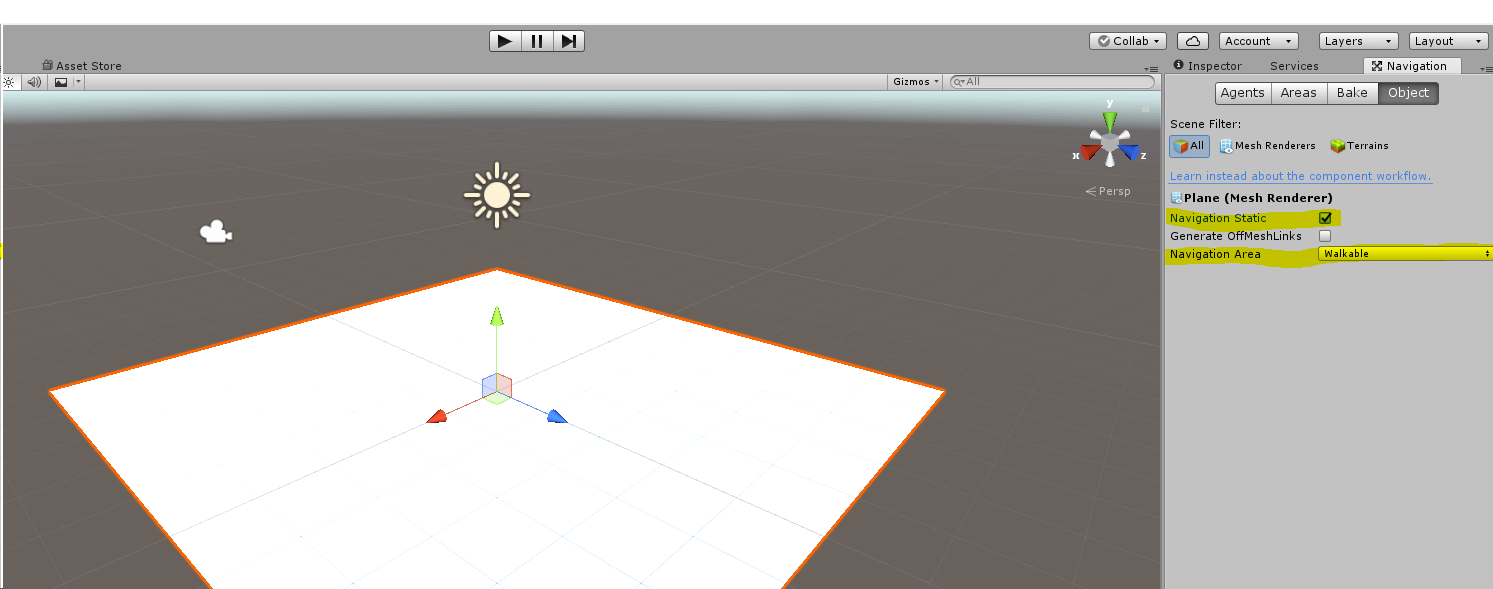
  2. Open the navigation panel: Window > AI > Navigation
  3. Select the Ground Plane and mark it as Navigation Static and Walkable
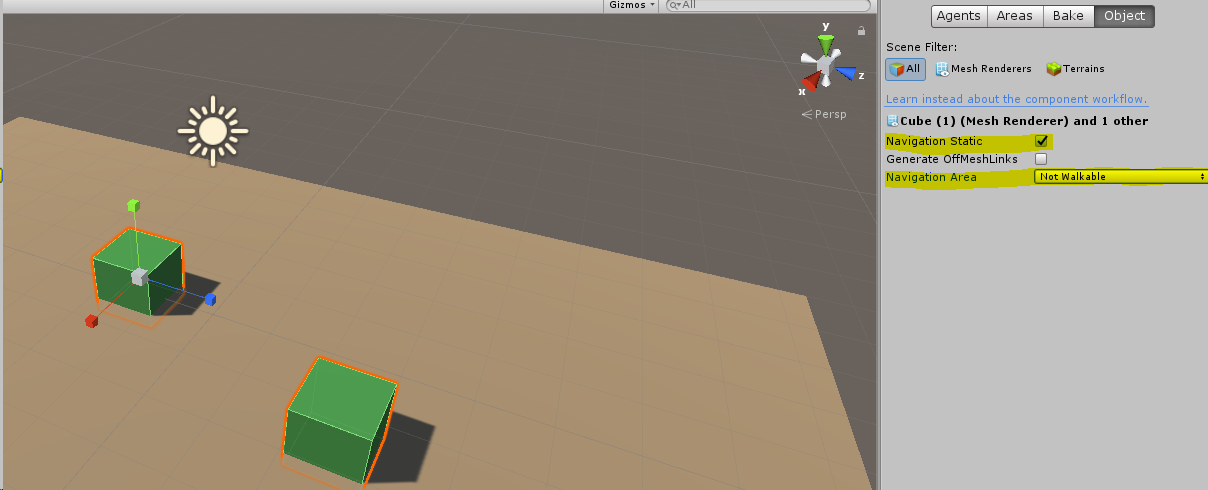
  4. Create some obstacles for the enemy to walk around, it’s a good idea to change the color of the ground and obstacle so you can see what you’re doing
  5. Marke the obstacles as Navigation Static and Not Walkable
  6. Select the Bake tab and choose Bake
Create NavMeshAgent and Player Character Controller
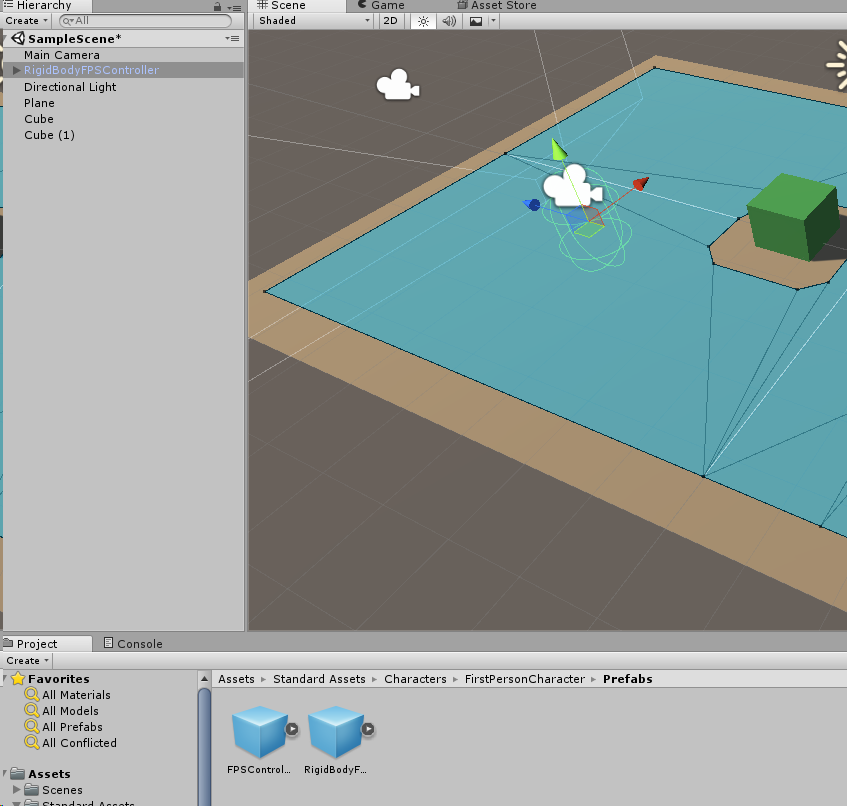
  1. Create a Character Controller for the player, or download the Unity Standard Assets FPS controller and place it in your scene (if using the FPS controller, be sure it is above the ground)
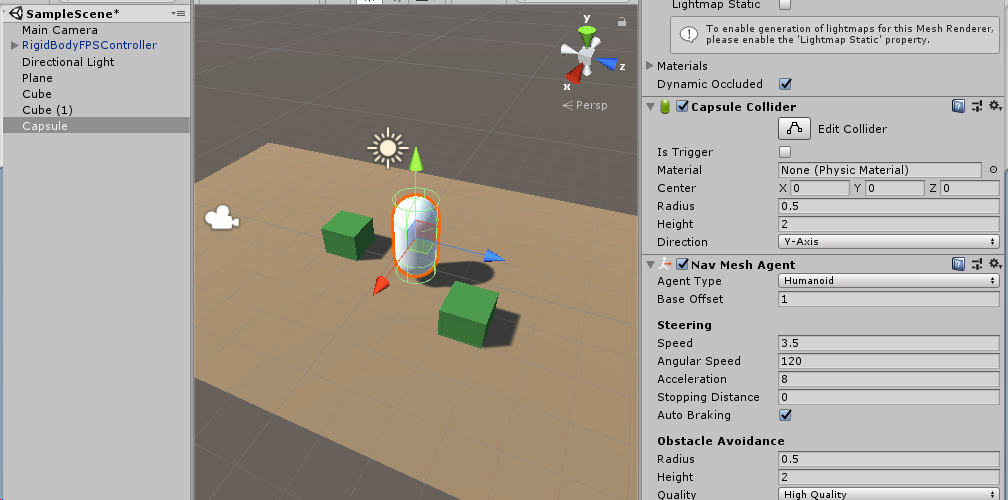
  2. Create a 3D Capsule object in your scene and give it a NavMeshAgent Component
  3. Create a new C# Script called Enemy and attach it to the Capsule
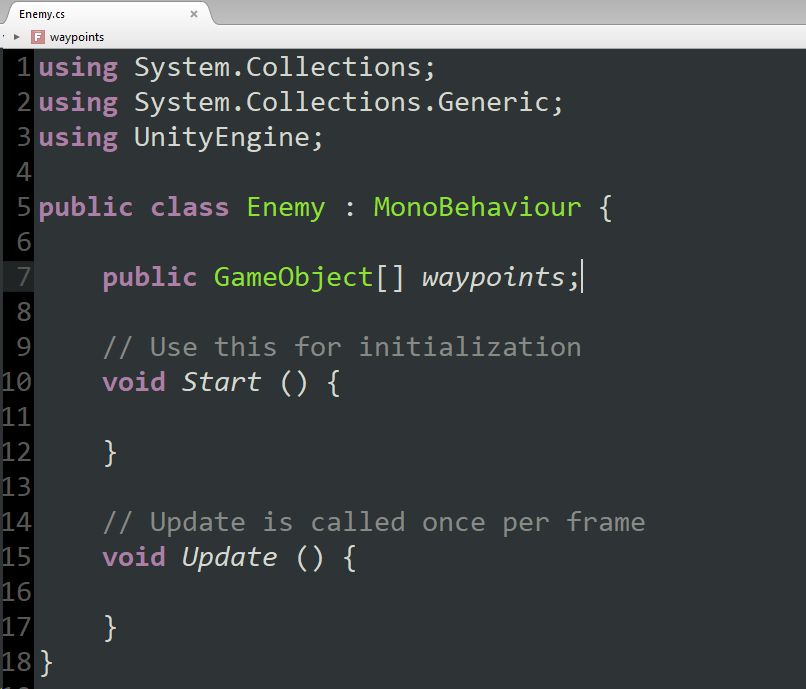
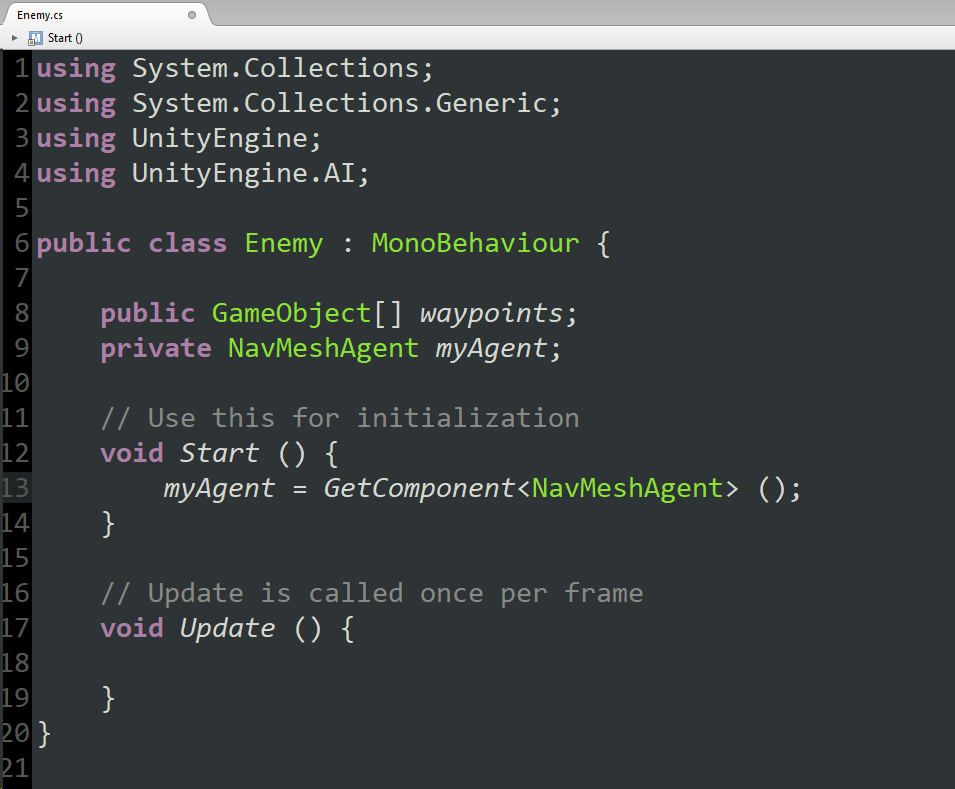
  4. Open the script and create a Public Array of GameObjects
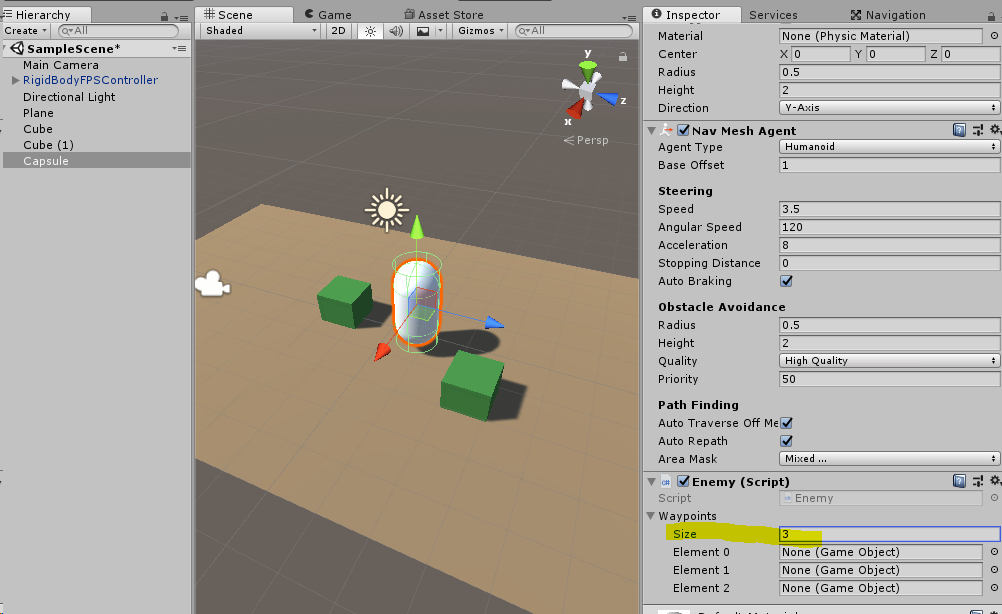
  5. Back in the Unity scene, select the Capsule and set the public array size to 3
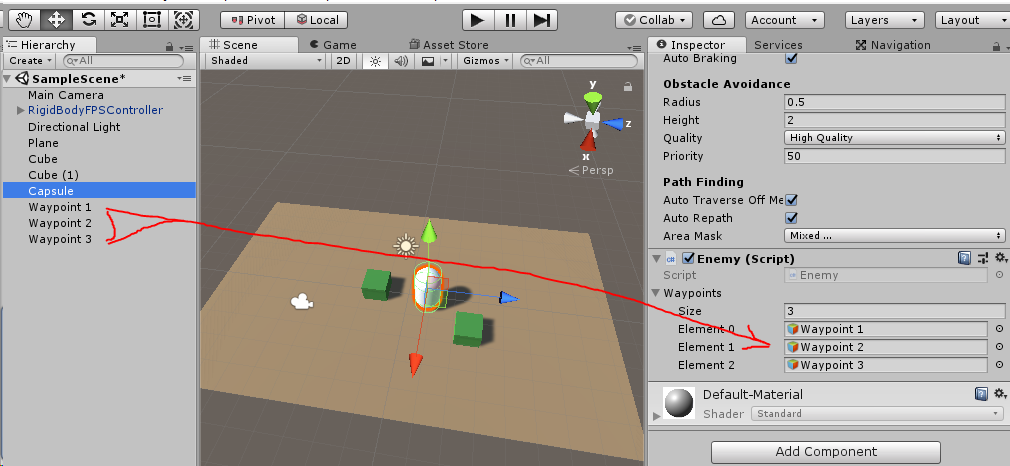
  6. Create 3 Empty GameObjects and place them around the scene (these will be the waypoints for the enemy to walk to)
  7. Drag each of the waypoints into one of the GameObject slots on the Capsule
  8. Back in the Enemy script, add using UnityEngine.AI to the top of the script, create a private NavMeshAgent and in the Start function give it a reference to the NavMeshAgent component
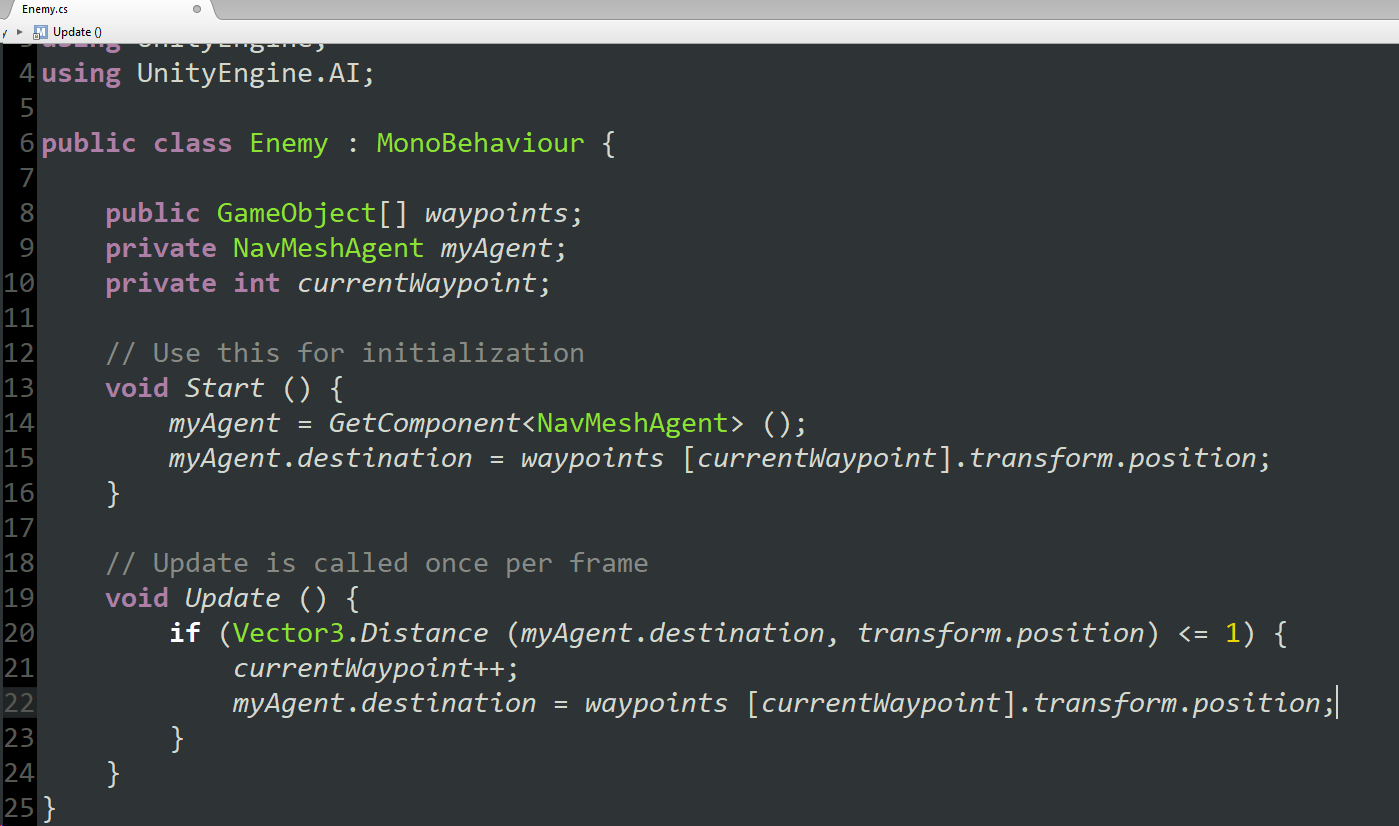
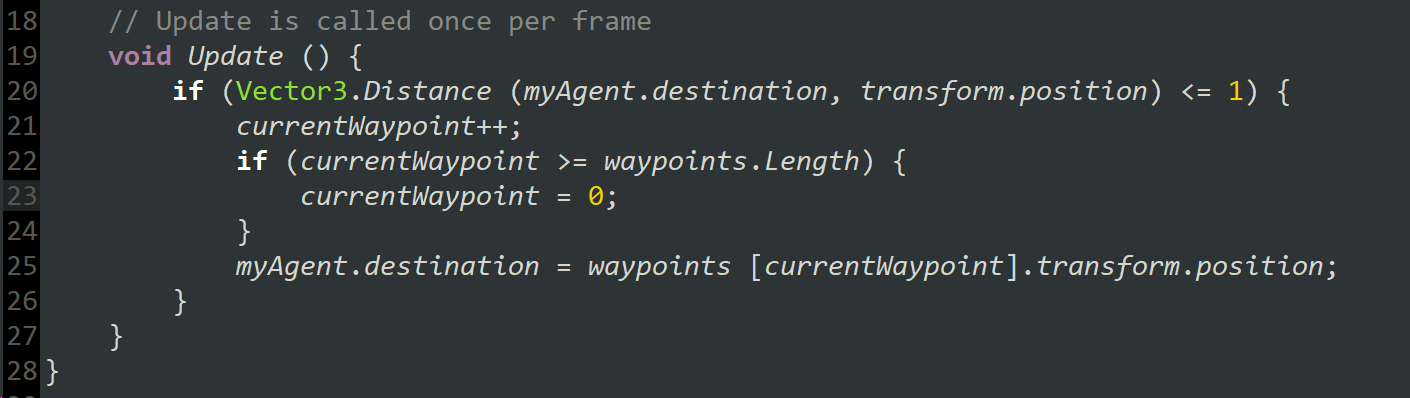
  9. Create a private int to keep track of the current waypoint, then in the Start and Update functions specify the desired waypoint for the NavMeshAgent.destination
  10. Save and test and you will see the enemy walk between each of the waypoints until it reaches the end of the patrol path...update the script so the patrol loops by resetting currentWaypoint to 0 when you reach the end
  11. Test again to ensure the enemy loops on the patrol path
Link Character Model and Animation to NavMeshAgent
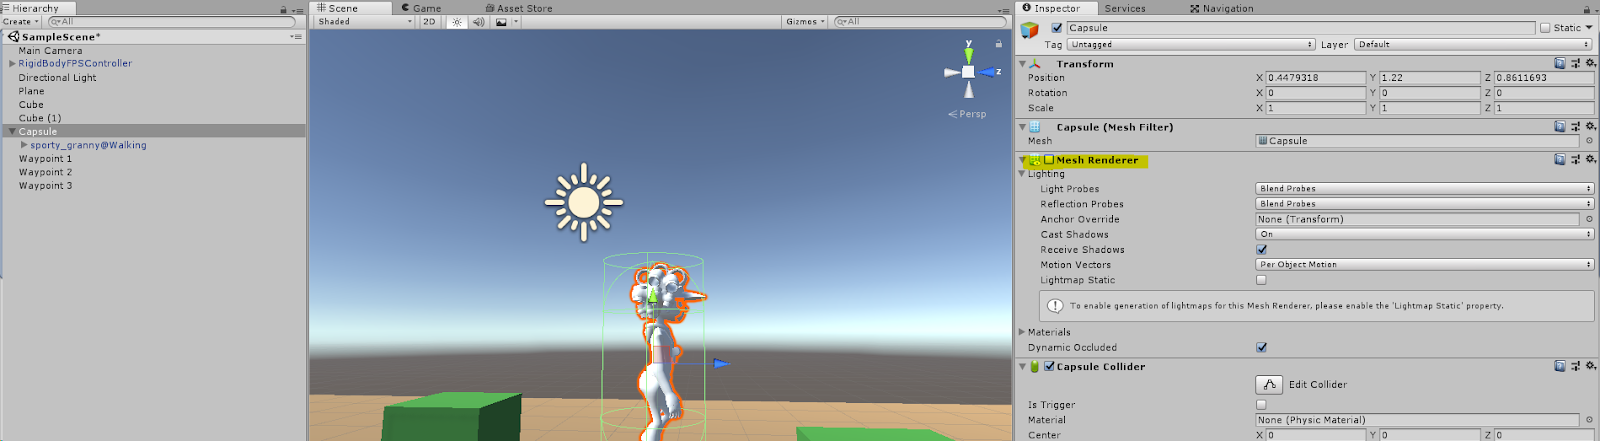
  1. Drag the enemy character model onto the Capsule to make it a child and turn off the Mesh Renderer on the Capsule
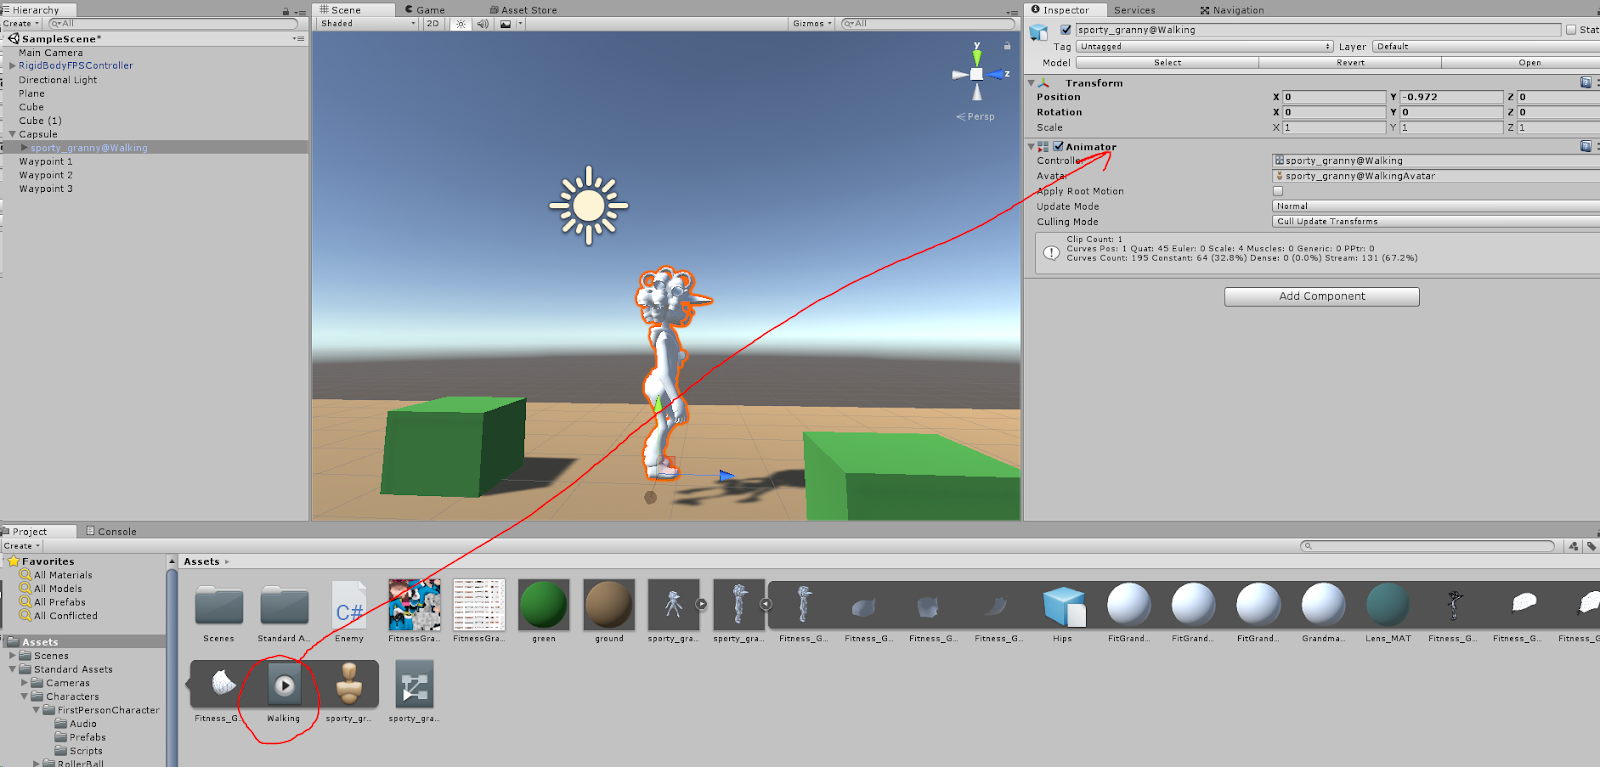
  2. Select the enemy character model in the scene and drag the Walking animation onto the Animator component

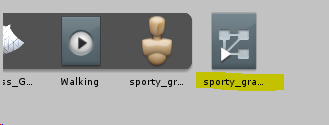
    Note that it creates an Animator Controller in your project folder when you do this
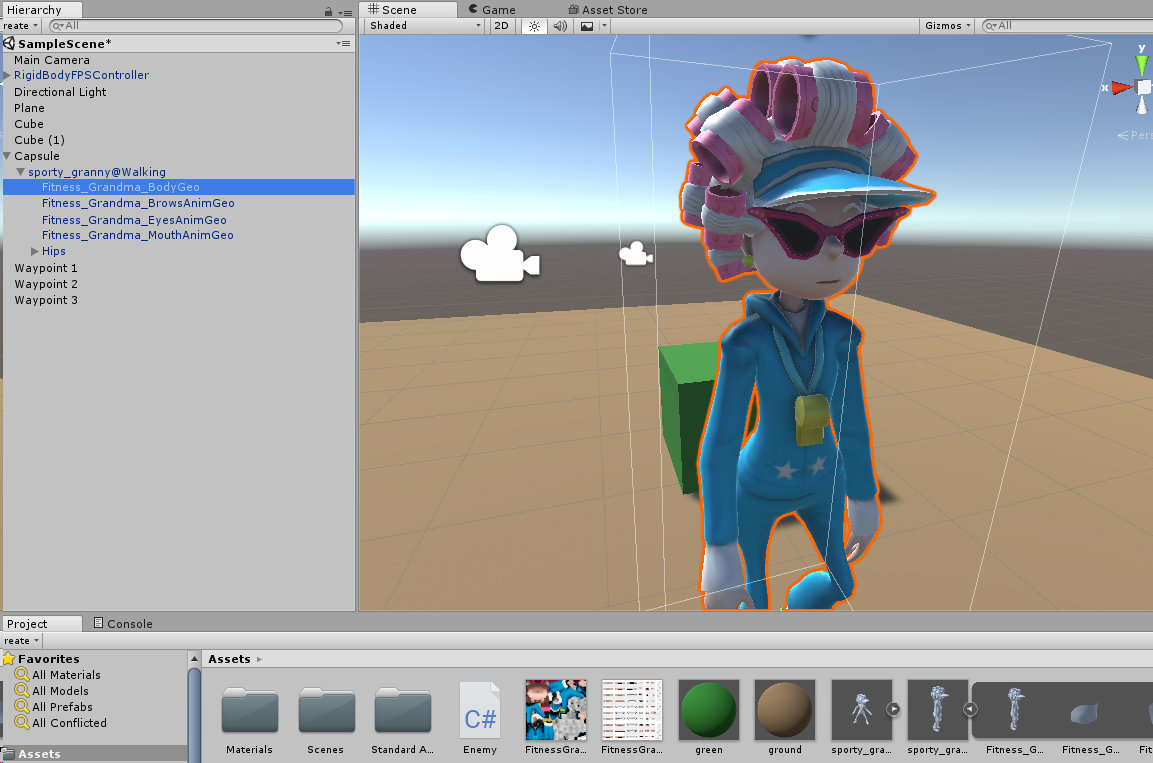
  3. Apply the textures to the character Geo
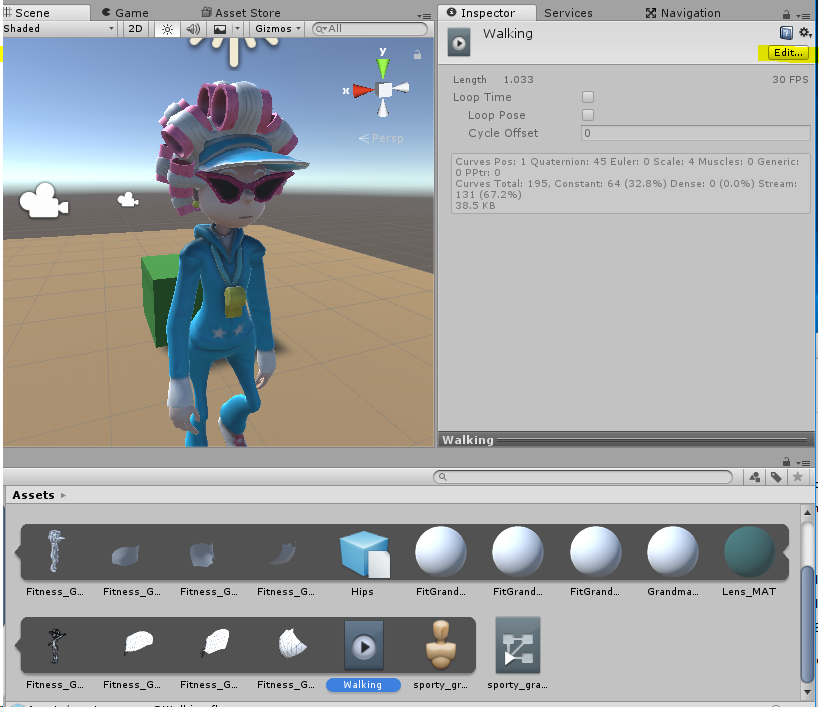
  4. Select the walking animation and choose Edit
  5. Check the box for Loop Time and Apply
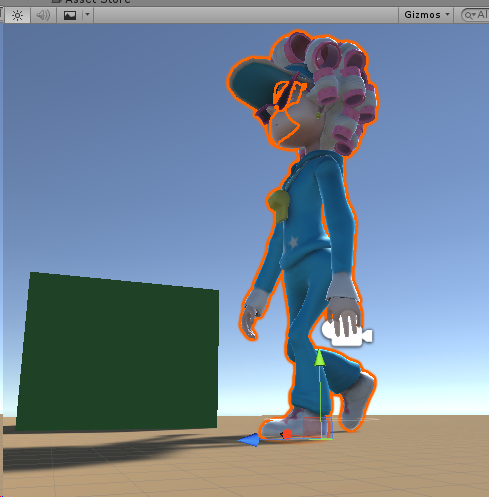
  6. Test again to see the character walking along the patrol path. While testing, check to ensure the character’s feet are making contact with the ground
Script Enemy Vision and Attack Trigger
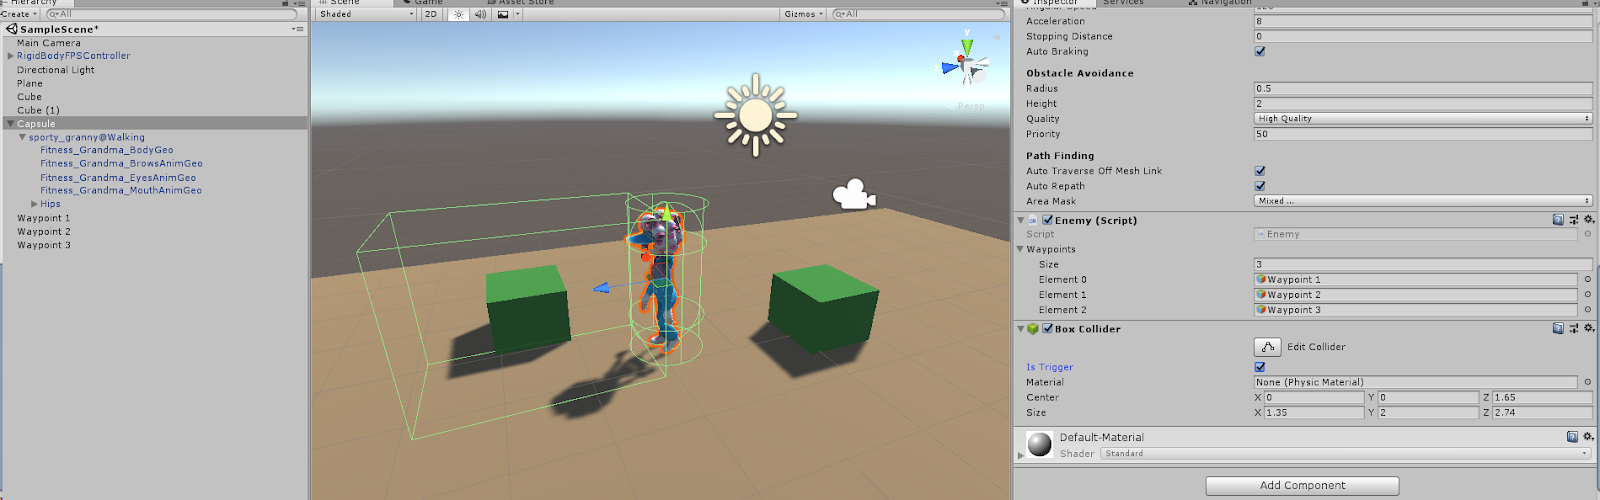
  1. Attach a Box Collider component to the enemy Capsule and mark it as Is Trigger and position and scale it to represent the view area of the enemy
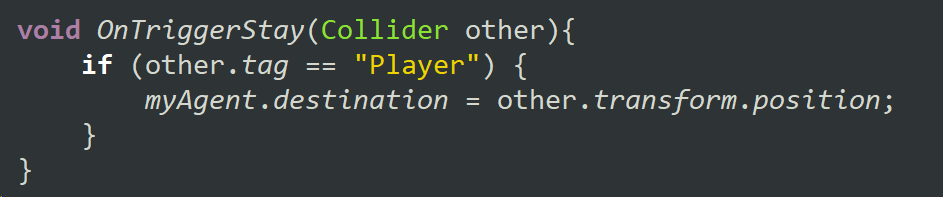
  2. Add an OnTriggerStay function to your Enemy script to check for the Player character
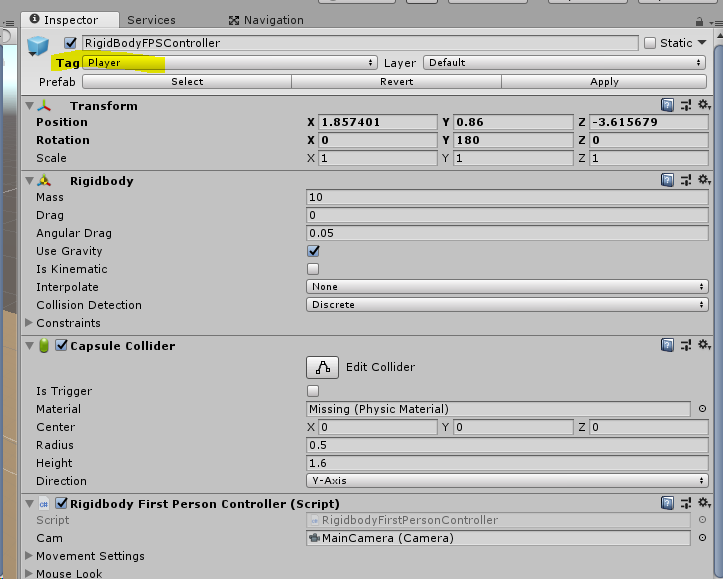
  3. Be sure to tag the player as Player
  4. You may want to expand your play space to test this new functionality, be sure to rebake the NavMesh if you do
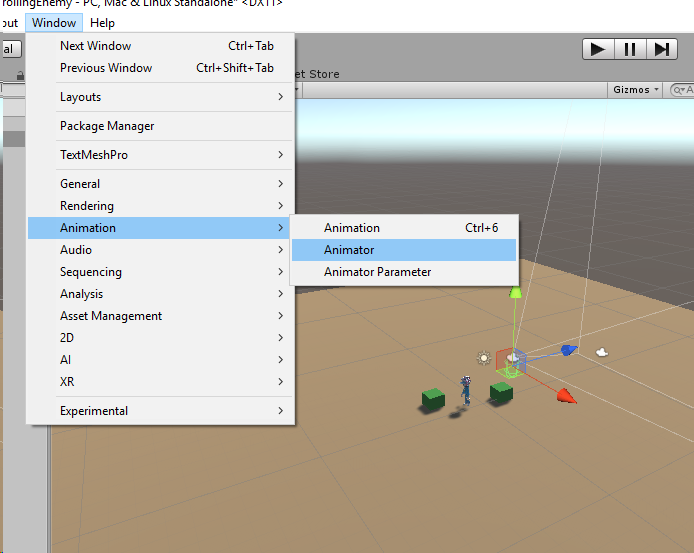
  5. Open the Animator wind from Window > Animation > Animator
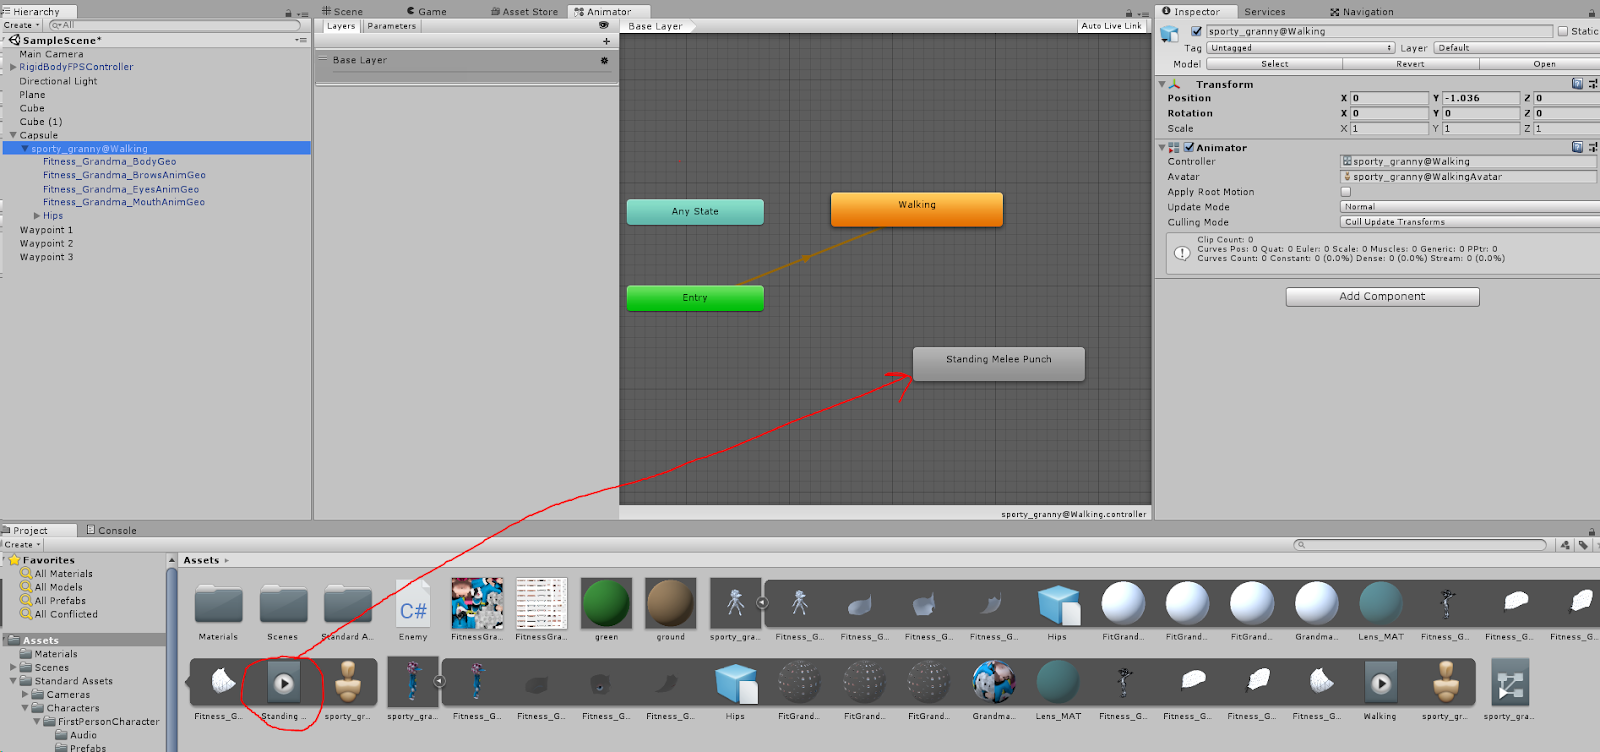
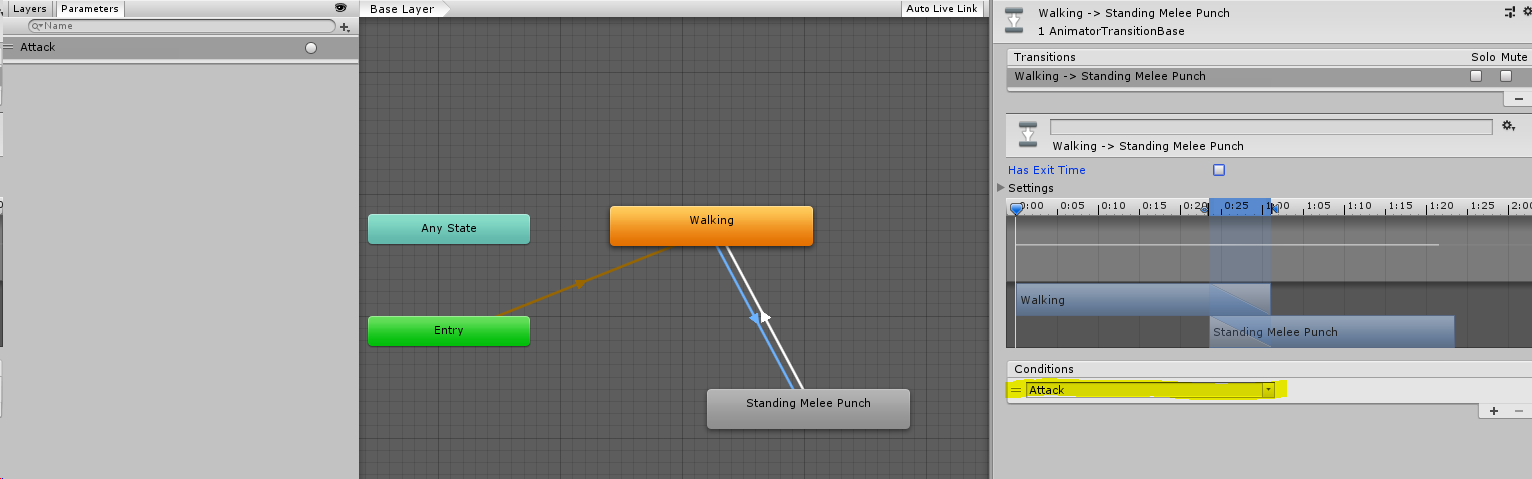
  6. Select the animated enemy character and drag the Attack animation into the Animator
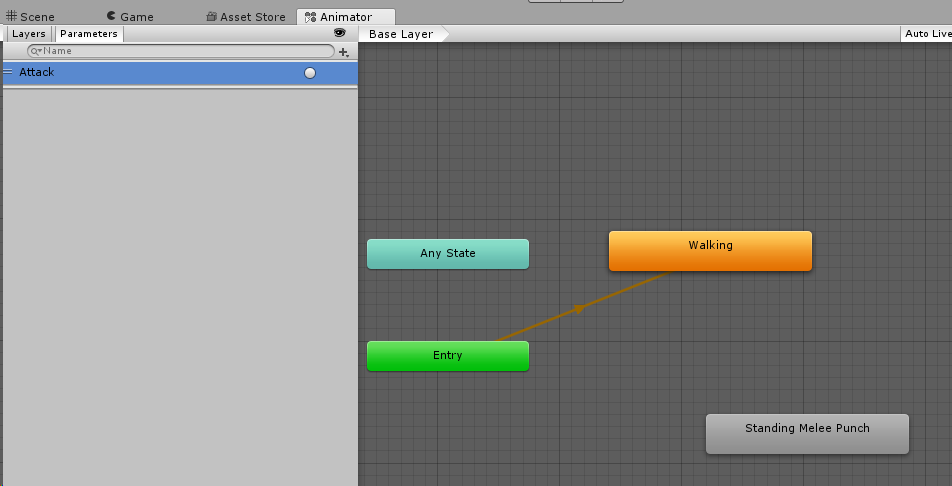
  7. On the Parameters tab make a new Trigger called ‘Attack’
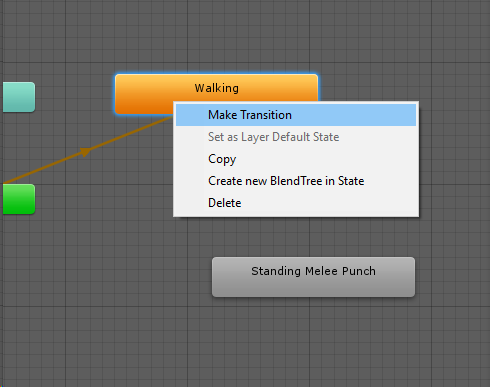
  8. Right click on the Walking animation and make a transition to the Attack animation
  9. Make a corresponding transition from the Attack to the Walking animation
  10. Select the transition to the Attack and add a condition for the Attack trigger you made before and uncheck the box for Has Exit Time
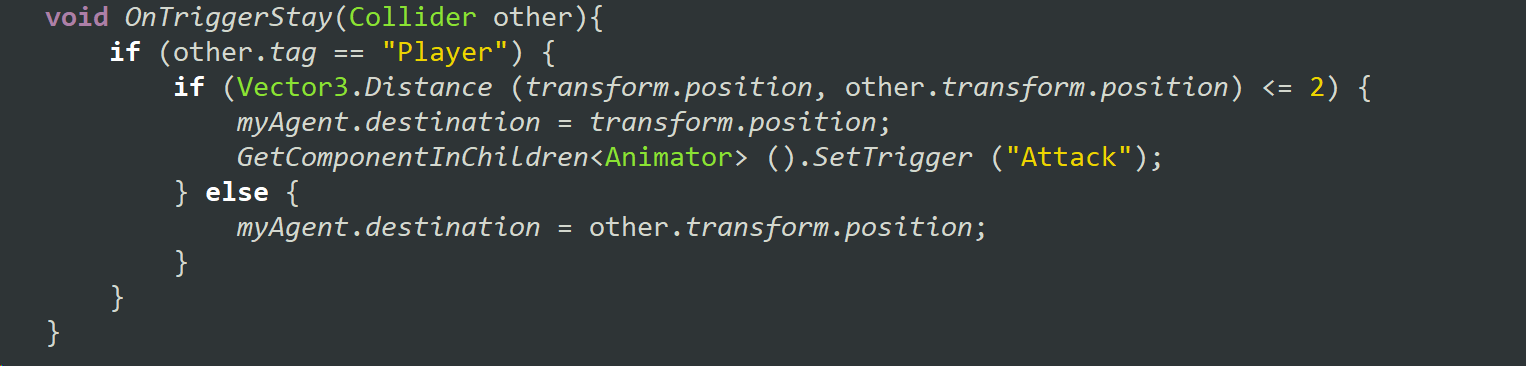
  11. If the enemy is within range of the player, set the target destination to the enemy’s current position and trigger the attack animation, otherwise use the player’s position as the destination
Summary
After completing these steps, you should have a patrolling character that will interrupt it’s patrol to follow the player if the player gets in her view range, and if the enemy gets close enough to the player while following she will attack. If the player gets out of the view range of the enemy she will return to her patrol.

Thanks for reading, and if you've found this tutorial helpful I hope you will subscribe here and on my Youtube channel: www.youtube.com/c/AstireGames

Sunday, August 5, 2018

Prototyping Game Systems, Part 2: Building a Prototype Play Space

This is Part 2 of a 5 part series on my latest course on Pluralsight: Prototyping Game Systems. If you missed Part 1 be sure to start there!

In part 1 we covered the design-prototype relationship, how to assess design needs, and we discussed game mechanics and systems. Next we need a playable space to prototype in. When prototyping in an existing game, it's generally best to make a "safe" scene for prototyping the new mechanics, to avoid causing issues that might break the main playable scene. This is especially important if multiple developers are working on the project simultaneously.

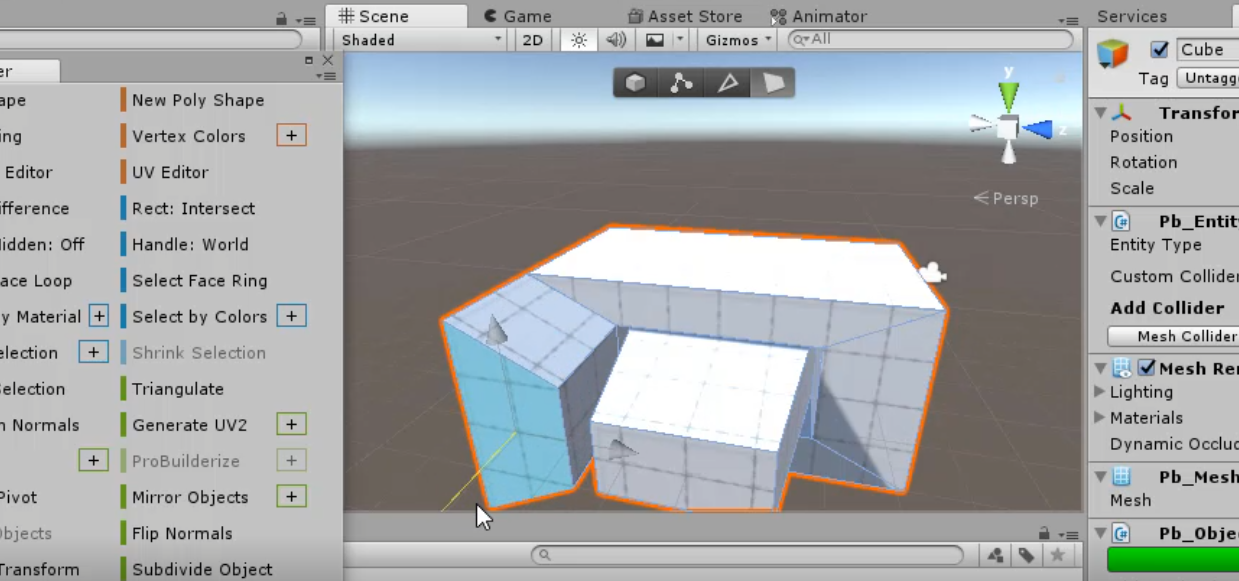
In this course we are using Unity to develop the game, and Unity has an excellent built-in prototyping tool called Pro Builder.


Pro Builder allows you to create and manipulate 3D shapes in the Unity editor, without needing an external 3D modeling tool.


With the help of Pro Builder, you can easily shape out a playable space in just a matter of minutes. The manipulator tool allows you to adjust faces, edges, and vertices.


You can also extrude and bevel to make interesting shapes and crevices.


And when you are satisfied with your shape, you can apply textures, either to the entire shape or to individual faces. Pro Builder even has a simple UV editor to give you more precision for the texture.

For this course I've created a large open space with stairs and an arch, so the walkable ground has various heights and there is an area to walk under where the character won't be visible.


Next we drop in our character model and add a nav mesh. This game is in 3rd person, and the character controller has already been built for us and uses the nav mesh to move around.


The way the nav mesh works is it collects information about any surfaces that are marked "Static" and generates a "walkable" area, shown with a blue overlay. This nav mesh tells the character where it can walk via a Nav Mesh Agent component, which is attached to the character controller.


Now we have a playable space set up for our character to run around that doesn't interfere with the main scenes of the game, so we are all ready to start prototyping the new mechanics.


In part 3 we will build new mechanics for the game, including digging, looting, and powerups. Thanks for reading, and if you enjoyed this please check out the full course on Pluralsight: Prototyping Game Systems for Swords and Shovels.


Sunday, March 25, 2018

Game Dev Tutorials

Many game devs get their start from following tutorials, because even though there has been a surge of game-related classes and programs in colleges and schools, a lot of the content taught is overarching principles of design and workflows. Hands-on how-to material is still largely dominated by online tutorials.

Tutorials are a great way to learn how to build specific mechanics within specific engines or frameworks, and can be beneficial even for seasoned developers. Often tutorials cover not only scripting, but also art asset creation, world building, animation, and effects...you can make a complete game from scratch by following a tutorial, or you can pick up bits and pieces to fill in knowledge games.

For the past year I've been working on tutorializing content that I teach in classes, workshops, and camps. This is beneficial to anyone participating in my classes because it means they can work at their own pace and continue to learn even when I am not there, and it also allows people from all around the world to experience this content because it is available online (and much of it is free).

If you are an aspiring game developer, or if you teach game dev classes or workshops, I hope you will consider checking out my suite of tutorials. Here is a rundown of what I have to offer (all tutorials use the Unity game engine):


This tutorial covers everything you need to know about using 2D sprites in Unity, either for 2D game objects  animated for 2D gameplay, or for UI elements in a 2D or 3D game. Topics covered include sprite sheets, color, sliders, and rotation/scale/position animations.


Unity has a built-in physics engine that allows you to quickly and easily animate objects using physical properties such as force, torque, friction, mass, and bounciness. In this tutorial you will learn how to use these different properties to create a wide range of movement and behavior for physics-based objects in both 3D and 2D.


In addition to rigidbody physics, Unity also supports cloth physics. This tutorial covers the basics for setting up an object to behave like cloth, including constraints, stiffness, stretchiness, and animated force for wind and gravity.


This tutorial breaks down the most common features of Unity's Particle System component, including sprite sheets, velocity over lifetime, color over lifetime, trails, emissions, and bursts.


One of the biggest distinguishing factors from a student game and a professionally developed game is the "juiciness" of the interactions. The hallmark of game design is making the game "feel good" and so much of that good feeling comes from making things feel reactive to the player's actions. This tutorial covers specifically using particles and sound effects to make the interactions juicy.


This tutorial is available on Pluralsight and covers the full pipeline for creating your first game prototype. It covers whiteboxing, importing assets, building a level, adding animations, particles, lighting, and sounds, and making it a complete experience with a UI start screen and win/lose screens.


https://www.pluralsight.com/courses/unity-vr-fundamentals

This tutorial is specifically intended for aspiring VR developers, and gives the basics of getting started with room-scale VR on the Vive, and mobile VR.

Please subscribe to our youtube channel for more tutorials, gameplay videos, and other fun things! Thanks for reading!

Tuesday, May 9, 2017

Game Prototyping in Unity, Part 2: Art and Sound Integration

This is Part 2 of my short blog series "Game Prototyping in Unity" about my recently released tutorial. If you have not already read Part 1 I recommend starting there!

In the second module of my tutorial I cover integrating art and sound in Unity and adding lighting and particles.

The first step is bringing in your model and texture files.


Then you will create a new material in Unity. Unity materials have a lot of properties you can work with, but the easiest ones to start with are the diffuse color (which is just the color of the material), normal color (which determines the detail or roughness of the surface), and specular or metallic color (giving it a shiny quality).


When you are done setting up your models with materials and textures, you can turn each art asset into a refab and replace your whitebox with art.


Make sure there are no areas where the player can walk out of the level. You don't need to follow your original layout, just use it as a general guide.


Once your layout is replaced with art it's time to add some lighting. For this type of level I want to use torches to give it a medieval feel. So I used a fire effect from Unity's default particle package and made some modifications so it would fit with this art style.


The flame particle system comes with a point light, but I also like to add a couple more point lights around each torch so you can see the details of the torch.


Once you have your bright areas, be sure to give some thought to lighting your dark areas. It's tempting to just keep dark areas unlit and leave them mostly black, but that generally doesn't look good in games because the player really can't see anything at all.


If you want to keep the feeling of darkness but still give the player enough visibility to play, use some dark blue lighting to fill the darkest areas.


When you are done, you'll have a well-lit level that conveys mood as well as giving visibility.


The final step in asset integration is adding sound effects. Rather than attaching ambient sounds to the main camera, try adding ambient audio sources as 3D sound around the scene, so as the player walks the sound changes. This helps bring the level to life.


If you enjoyed this blog post, please check out the video tutorial on Pluralsight which will take you step-by-step through this whole process! The next section will cover creating a character controller.

Thanks for reading!