Showing posts with label game dev log. Show all posts

Friday, October 5, 2018

The Making of Cosmos Arena


Cosmos Arena is a local multiplayer party game for up to 4 players. Right now it is PC only but we hope to make an XBox port as well.


I'd like to share with you the story of how Cosmos Arena came to be.

Getting Started

My team started working on this project in 2016 when I was still working a full time job in AAA. I launched my studio Astire Games and brought on some contractors, most of whom were also working day jobs, so we were moonlighting to get to the first prototype.

First Prototype

In this prototype we started on the core mechanics - character movement and traps

At some point I realized that AAA work was not satisfying my drive as a developer, and working nights and weekends on Cosmos Arena wasn't enough for me. On top of working AAA and moonlighting, I was also teaching Game Design as an adjunct faculty.

Leaving a comfortable day job for a side project is a risky move, and I don't think I would have done it if not for the teaching gig. I was pretty confident I could live on my teaching income for at least a few months, so I decided to take the leap and I left AAA to go indie.


Funding

Anyone who has tried to get a project up off the ground knows that it takes money. Even if you are the only one working on the project, you at least need enough for yourself to live on, but if you plan on having other people work on the project then you need a starting fund.

I was teaching 8 hours a week, and I figured if I really stretched I could live on that income. But I also wanted to have other people working on this project...There wasn't a particular skillset I was looking for since it was all prototyping at that point, but working alone can be lonely and it can be hard to stay motivated. So I found some friends who were looking for a side project who were willing to work on the cheap, and I dug into my savings from my time working in AAA.

In a lot of ways I got really lucky - I have some very talented and supportive friends with a wide range of skills, and it wasn't long at all before we had a second prototype with character animations, obstacles, sound effects, and a start screen.

Second Prototype


Contract Work

Self-funding Cosmos Arena had a limited lifespan, which I knew going in. I had hoped to get the prototype to a point where I could start soliciting outside funding.

This is where my luck started to run out...I had basically no idea how to get funding for a project. I tried looking for potential publishers, but the prototype was just not ready to meet those expectations. On top of that, I hadn't been able to find an environment artist, and the character artist and one of the programmers were leaving for new full time jobs.

I managed to rough out the scene with some placeholder art from the Unity Asset Store, but it still needed a lot of work and I was running out of money and people.

First Art Style


Around this time I decided I either needed to get a job, or find some contract work for my team. As it happened, a contract project kind of fell into my lap. I had a programmer and a sound designer still on my team, and I was contacted by a couple who had a vision for a children's app and a budget for development. They already had some art made for it, so I jumped at the opportunity.

Contract work was great, it allowed me to keep my team together and add some new folks, and it added to the company bank account. But it was time-consuming, and it pretty much put Cosmos Arena on the back burner for several months.

Showcasing

At a couple of different times, we had an opportunity to showcase Cosmos Arena at local events. These opportunities were fantastic for getting me motivated to dive back into the project - usually there would be about 2 weeks to a month where I knew the game would be showcased and I wanted it to have something new to show, so there would be a hard push to get in new content and new features.

Showcase Build


Our showcase opportunities included the Intel Buzz Workshop at the Austin Games Conference, the Intel Indie Lounge at the Game Developers Conference, the Austin Game Dev booth at SXSW, and the IGDA booth at Dreamhack.

Second Showcase Build


Interns

Due to the sporadic nature of development on this project, all of the original team moved on to other things at various points during this timeline. Still on a tight budget, I decided to leverage my position teaching to find rising new talent looking for opportunities.

Initially I started taking interns at my company and letting them work on their own projects, which I then helped them publish. Finally I decided I had found the right interns for Cosmos Arena, so I offered them paid contract internships to spend the summer building levels.

Bringing on interns also coincided with finally having an artist to set the art direction of the project.

New Art Style and Levels


Art Direction and Iteration

There has been a lot of iteration and changes to the art style over the past two years, but honestly most of that iteration happened in the last 3 months. Here is a glimpse of some of that iteration...


Game Mechanics and Iteration

Not only did the art style change dramatically over time, also our core mechanics and design have changed. We've added new win conditions for different levels, replaced a health/damage system with a shield and one-hit-kill, we added a ghost mode when a player dies so they can take revenge on their killer, and we've incorporated building and planting to offset the killing and destroying.

Development


Alpha Release

We just hit our Alpha milestone and decided to make the game available for free for a limited time while we work through some bugs and collect feedback. If you've enjoyed learning about our development process, we would love for you to try the game and give us your feedback :)


Thanks for reading and thanks for playing!

Sunday, August 27, 2017

Game AI: Non-Human Behavior Part 5

This is part 5 of a series on Game AI for Non-Human Behavior. Here's what you might have missed!
Part 5 will be a deep dive into sensory input, and resulting behaviors.

Source: Atari
In 2015 there was an article published in nature that used Atari 2600 games to explore Reinforcement Learning in AI. Reinforcement Learning is the process of allowing AI to explore different options and learn behavior through a reward system, as opposed to Supervised Learning where AI performing sub-optimal behavior is explicitly corrected. The article, "Human-level control through deep reinforcement learning," examines sensory input used to understand the surrounding environment. In their research, the sensory input used correlates to visual input (or sight), allowing the AI to look at the pixels that make up the current game state.

Source: The Hunt, Netflix
In contrast, these blind catfish living in underwater caves have adapted to survive completely without sight. When one sense fails, we rely on honing our other senses to adapt to a world without the missing sense.

Source: https://askabiologist.asu.edu/echolocation
As children, we learn the five senses as sight, sound, smell, taste, and touch. These are the senses we as humans understand, because these are the senses we experience. However, there are other senses present in nature that are outside our area of experience. Bats, for example, use sonar in place of sight to determine the positions of things around them.


A "sense" is defined as a system of a group of cell types that responds to specific physical phenomena, which correspond to a particular region of the brain that interpret those signals. Some plants have specialized cells which detect gravity, allowing the plants to grow upright with their roots growing down into the earth.

Source: http://www.defenders.org/sharks/basic-facts
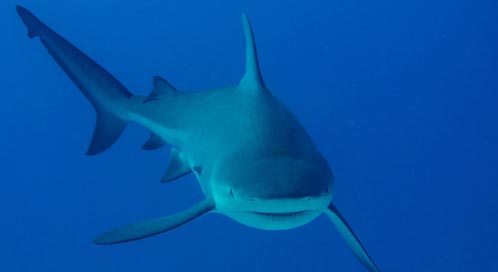
Even with senses we understand, such as smell, non-human creatures have far superior uses of them in many cases. Sharks can determine the direction a smell is coming from based on which nostril received the scent first.

Source: nature.com/scientificamericanmind/journal/v19/n4/images/
scientificamericanmind0808-22-I1.jpg
Though the focus of reinforcement learning is on changing behavior based on rewards, it relies on information about the environment being interpreted through senses. We can see something similar happen in the classic rat maze example - the hungry rat is placed in a maze that has a piece of cheese at the end and allowed to explore the maze until it finds the cheese. The rat is then placed back at the start of the maze, and this continues until the rat manages to navigate the maze perfectly. The cheese in this example is obviously the reward, but the rat needs a way to understand its environment in order to get the reward.

Source: http://www.smithsonianmag.com/smart-news/
were-terrible-distinguishing-real-and-fake-schools-fish-180953162/
Beyond just understanding the environment, the senses also allow organism to understand the creatures around them, resulting in group-based behavior like flocking. To put flocking in simple terms, we can use an algorithm that uses cohesion, alignment, and separation to simulate behavior well enough for gameplay purposes.

Source: http://harry.me/blog/2011/02/17/neat-algorithms-flocking/
Each agent in the AI flock will calculate it's desired vector of movement based on cohesion (the need to stay within in the group), alignment (the need to face the same direction as the group), and separation (the need to avoid hitting other members of the group). The calculation for cohesion is to look at the position of your neighbors within a specific range, find the center of mass, and move towards that center of mass. For alignment, the agent looks at the direction each of its neighbors is facing and aligns itself to the average. For separation, the agent will check to see if it is too close to any of its neighbors, and adjust accordingly. The three of these combined into the agent's velocity vector will result in a simple flocking behavior.

Source: https://www.gizmodo.com.au/2014/03/
what-happens-when-you-throw-four-sharks-into-a-giant-school-of-fish/
However, the flock's simple behavior may be disrupted by the presence of predators, causing the agents to need to assess their environment beyond just the position and orientation of their neighbors.

Source: https://www.wired.com/2011/12/
the-true-hive-mind-how-honeybee-colonies-think/
Bees are another wonderful example of teamwork behavior. Pheromones are special scented chemicals that allow some organisms to communicate information with each other via scent. Bees use pheromones the share information through the hive, resulting in a hive the essentially thinks together as if it were a brain with each bee acting as a neuron. I can imagine a similar system that could be used to have a group of friendly characters so coordinated that they act as a hive of bees with the player as their queen.

If you have enjoyed this series on AI for non-human behavior, please follow and subscribe!

Friday, May 12, 2017

Game Prototyping in Unity, Part 3: Character Controller

This is a continuation of my blog post series about a tutorial I made called Game Prototyping in Unity available on Pluralsight. If you haven't read the previous entries, check out Part 1 on whiteboxing and Part 2 on art and sound integration.

There are many times when you don't need to make a character controller from scratch - a lot of simple first-person games use Unity's default first-person controller. You may also have a game where a character controller is not needed at all, such as a top-down strategy or puzzle game. Unity also has a third-person controller, which can work well in some circumstances. However, if you know the kind of behavior your want from your character controller, it is sometimes easier to make it yourself rather than trying to find one that suits your needs.

When designing a character controller, I like to first imagine how I want the player to see the world and the character. Do I want the player to be up close to the environment, seeing things first-hand?


Or do I want the player to see the character they are playing, see that character's animations and how that character interacts with the world?


For this game we will make a third-person character controller.

The next decision to make is deciding what the player's input will be to move the character. In some third-person games, the player clicks a point for the character to move there. In other games the player uses WASD or the controller joystick to move the character. There are also cases where the character moves automatically based on the context of the world - ie. moving toward an NPC to talk to them.

Since we want to offer controller support for this game, it makes the most sense to use WASD since that has a direct mapping to the controller joystick.

We also need to ask ourselves "Can the player control the camera?"

In some third-person games the camera automatically follows the character with no input from the user. In other games, the user controls the camera with the mouse or with the right joystick. We will use the latter option.

For this character controller I've decided to use Unity's NavMesh because it automatically handles keeping the player on the ground and smooth gradual movement. The NavMesh allows you to determine if objects in the scene are "walkable" - meaning the top of the object is a surface the player can walk on - or "not walkable" - meaning that object is an obstacle or in some way inaccessible. Once you'd baked the NavMesh you can see what areas the player can walk on as a blue surface.


The scripting part is fairly simple, we just need to attach a NavMeshAgent component to our character and then tell it which was to move.


Unity also comes with a "Smooth Follow" script which can be attached to the camera and set to target the character, that was the camera moves when the character moves. We can also use Unity's "Simple Mouse Rotator" script to give the player control of the camera direction.


The final step is going to be giving the player a ranged attack. A ranged attack can be anything that is fired from a distance such as a gun or a spell. I think a spell would work better in the kind of world I am creating, so I will make a projectile object with a particle effect like a spell, and put it in a folder called "Resources" (it's important this one is spelled correctly, because this is the only folder Unity can load from at runtime).


Then we need to instantiate that projectile when the player fires.


Then on the projectile itself we want to tell it to move forward on every frame (since we are instantiating it facing the direction we want it to move, it should only ever move forward).


And that's it! Now we have a third-person character controller that moves with WASD and uses the mouse to look around, and can cast a spell at enemies.


Check out the full video tutorial on Pluralsight! Section 4 will cover scripted interactions.


Friday, June 10, 2016

Oculus Launch Pad

Last month I had the opportunity to attend an event at Facebook Headquarters called Oculus Launch Pad. This event was intended to promote diversity in the field of VR, and it met those intentions quite well. The program hosted 100 people for a day-long boot camp as a deep dive into developing games, apps, and film for virtual reality. I, along with 99 others who all came from diverse backgrounds and varying ages, genders, races, ethnicities, orientations, etc, spent a fantastic day learning about the technical side of putting a game on the GearVR, tips and tricks for designing "comfortable" VR content, how to keep a project on track and finish on time, and the importance of story and immersion in the VR world. The day concluded with a Q&A with Palmer Lucky and a networking mixer for all of the participants to get to know each other and learn about everyone's interests and projects.

On the technical side, it was great to have an opportunity to go through the process of getting an application from Unity onto the GearVR. I'm outlining the process here for anyone else who may be interested in making something for GearVR:

1. Get the latest version of Unity, and during the initial download be sure to check the box for "Android" from the list of development platforms (if you already downloaded Unity and don't have the Android package you will need to go back to the Unity downloader to get it).

2. Visit the Oculus developer website and download the Oculus SDK and Oculus Unity Utilities, and import the Oculus Unity Utilities package to your Unity project

3. Download and install the Android SDK. It will launch a download manager where you can select different versions. you can download as many versions as you like, but you will at least need API level 19. When you select download, you will need to agree to the terms and whatnot, but it is not super clear from the prompt you need to select "agree" for each of the download items in your selected list, so if you have two items selected you will need to scroll to the bottom to "agree" for the second one.

4. Create an OSIG for your device. This one is a little complicated, here are the details

  • Put your Android Galaxy device into debug mode (go to settings > device and tap the build number a bunch of times)
  • On your Android device go to Developer Settings and check the box for "USB Debugging" then plug it in to your computer
  • Open Command Prompt (or Terminal on a Mac)
  • d. Navigate to the Android SDK Tools folder (use 'cd' to change directories, 'cd ..' takes you up a directory, 'cd Directory_Name' takes you down into specified directory)
  • Use the command 'adb devices' and it will give you a list of IDs for connected devices (you will probably only have one) - if you have trouble with this step you may need to update the drivers on your computer
  • Copy your device ID, then go to developer.oculus.com/osig and enter the ID
  • Download the osig file generated by the Oculus website and copy it into the following directory inside your Unity project - Assets/pluggins/Android/assets
  •  Note that you will need a separate OSIG file for each device you want to test on; you can have as many OSIG files in the assets directory as needed

5. In Unity go to File > Build Settings. Be sure to add the scene you want to build to the list of scenes.

6. Select 'Android' from the list of platforms, then click "Player Settings" at the bottom. You can also hit "Build" right now to check if your SDK is setup properly, it will let you know if it cannot find the Android SDK (it may also prompt you to download the latest JDK which are also needed to run the Android SDK).

7. In the player settings panel which should have opened on the right side of the screen, scroll down to other settings and check the box "Enable VR", then scroll down to "Other Settings" and fill in the bundle identifier (you can use whatever company and product name you want but you need the company and product name at the top to match).

8. Sign your application - under "Publish Settings" check the box for "create new keystore" then click browse and name your keystore file, then give it a password (be sure to remember this password). Then set an alias and password for this keystore (it can be the same password or a different one).

9. Be sure your Android device is still plugged in and the screen is on, then hit "Build and Run" and the game will automatically deploy to the phone.

10. Unplug the phone from the computer. It should prompt you to put it in the GearVR, but if it does not then find your newly made build (it probably has the Unity logo right now) and run it, then when it prompts you put it in the GearVR.

I hope this is helpful to anyone trying to get started in GearVR development.  Feel free to respond with questions if you have any trouble with these steps :)