Showing posts with label character design. Show all posts

Tuesday, March 12, 2019

NPC Quest Giver Tutorial

This tutorial will cover creating an NPC Quest Giver using Unity, C#, and Mixamo. We will have an NPC that wanders along a path and can be interrupted by the player approach.

NPC Quest Giver
This tutorial will build off the core functionality from the Patrolling Enemy tutorial.
Modify the Spotted Functionality
  1. When the NPC spots the player, she should stand still instead of following the player
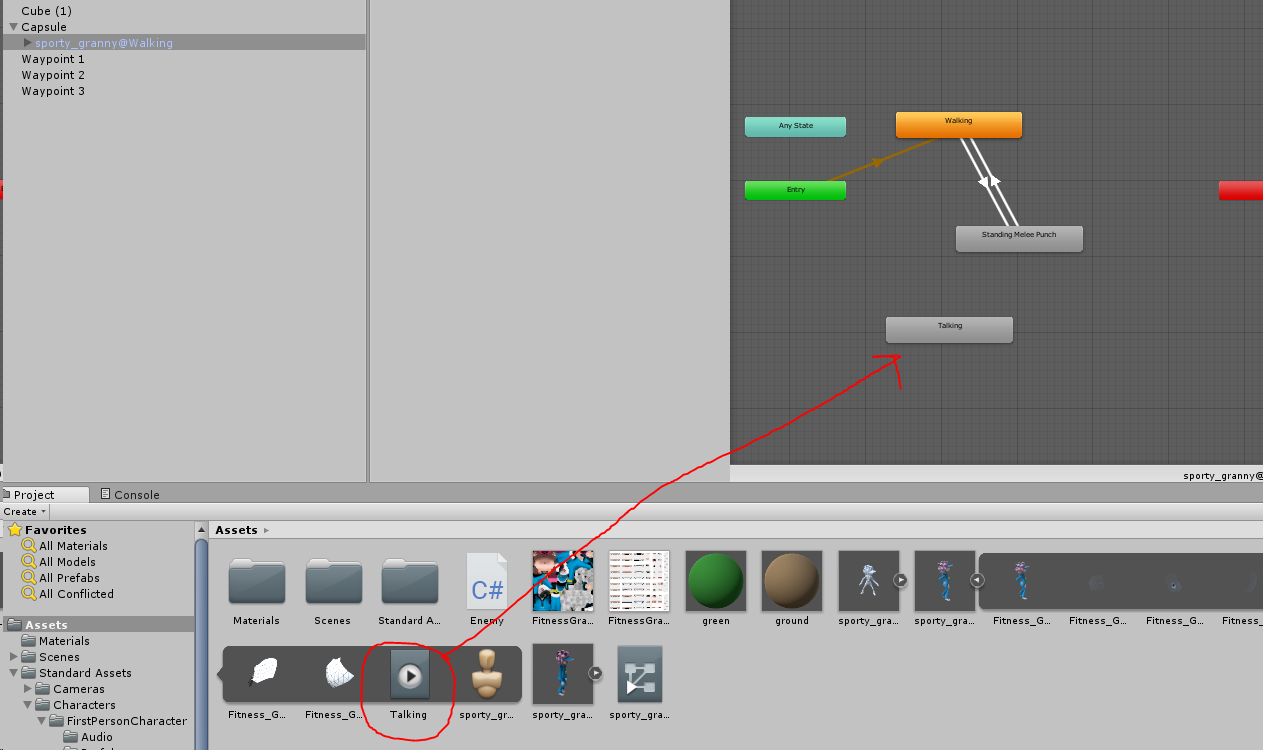
  2. Instead of an attack animation, we will import a friendly “talking” animation from Mixamo
  3. Import the new animation, and add it to the Animator Controller for the character
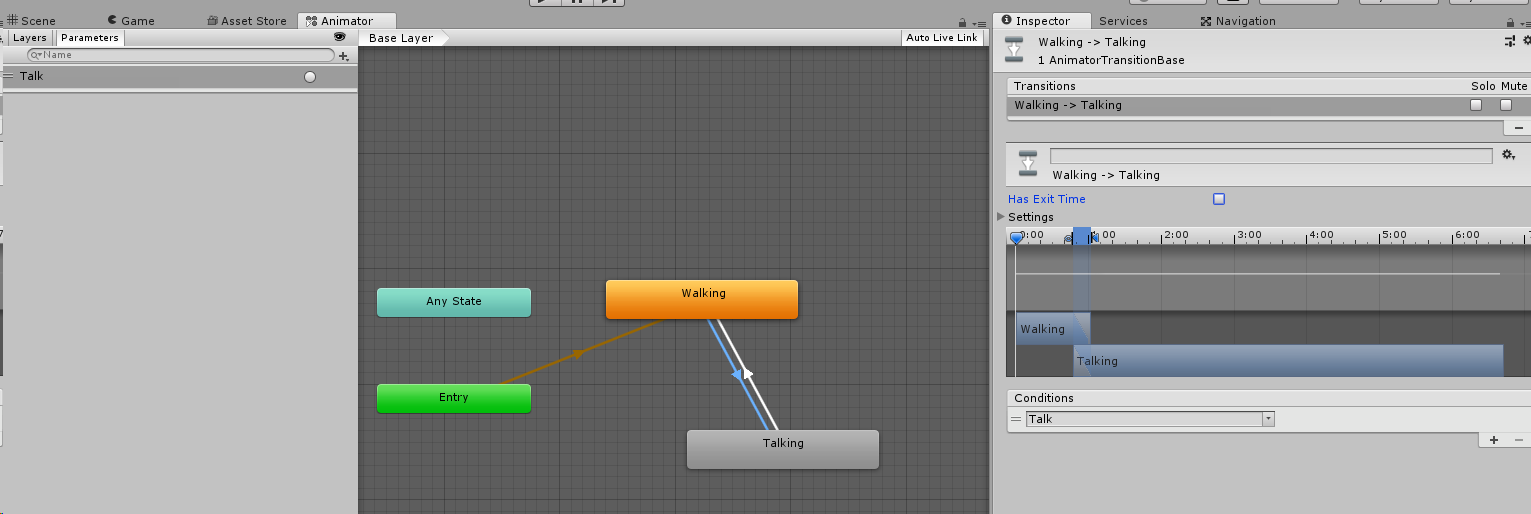
  4. Remove the Attack animation and Trigger, setup the Talking animation as before, with a Trigger called “Talk” to transition to the Talking animation
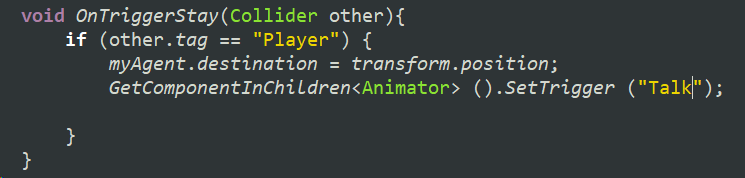
  5. Change the Animation trigger in the script
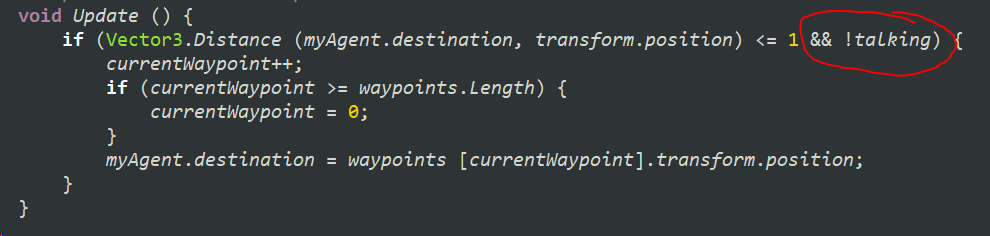
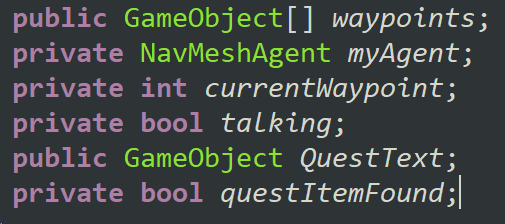
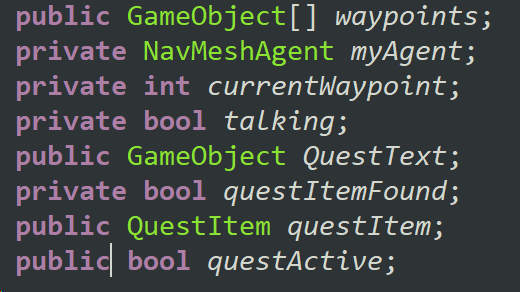
  6. We also want to stop the character from returning to her patrol, so we will add a bool at the top called “talking”
  7. And check for that bool  in our distance check in Update
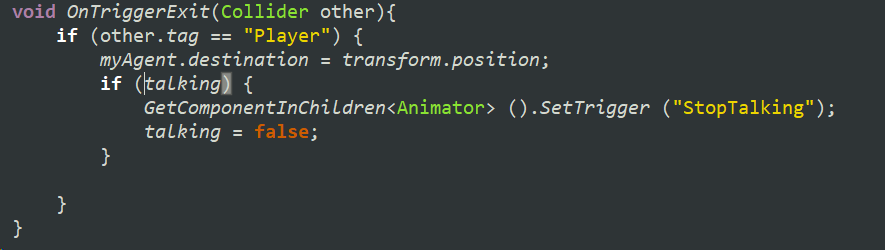
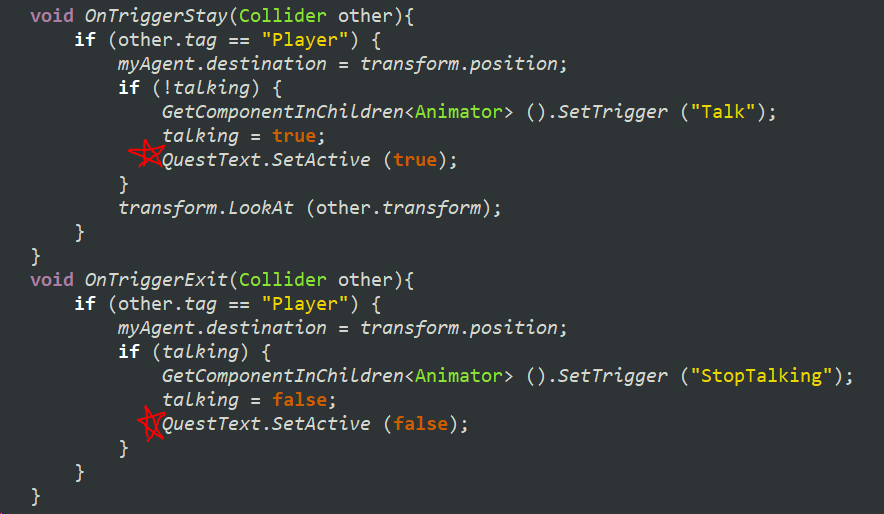
  8. We’ll also add OnTriggerExit to set the character back to her patrol
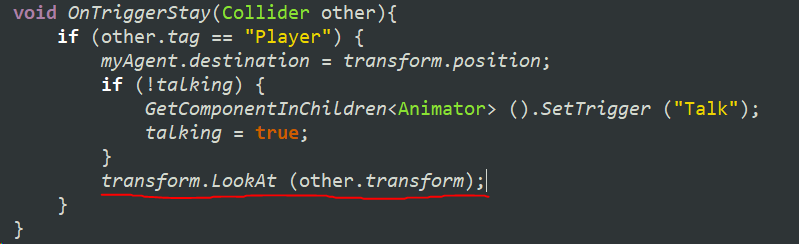
  9. It would also help if she looks at us while she’s talking
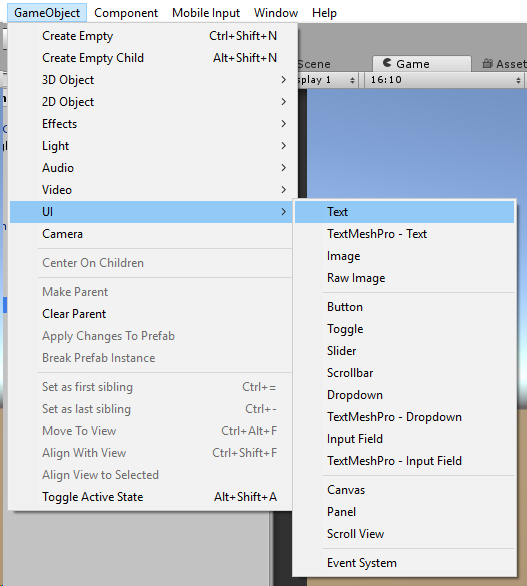
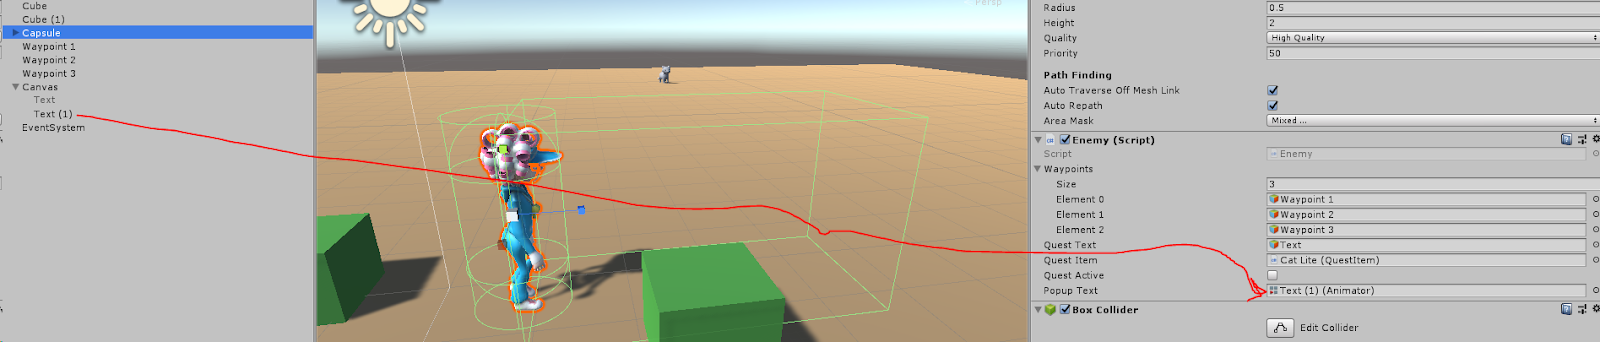
  10. Lastly, add popup text for the NPC’s dialogue using GameObject > UI > Text
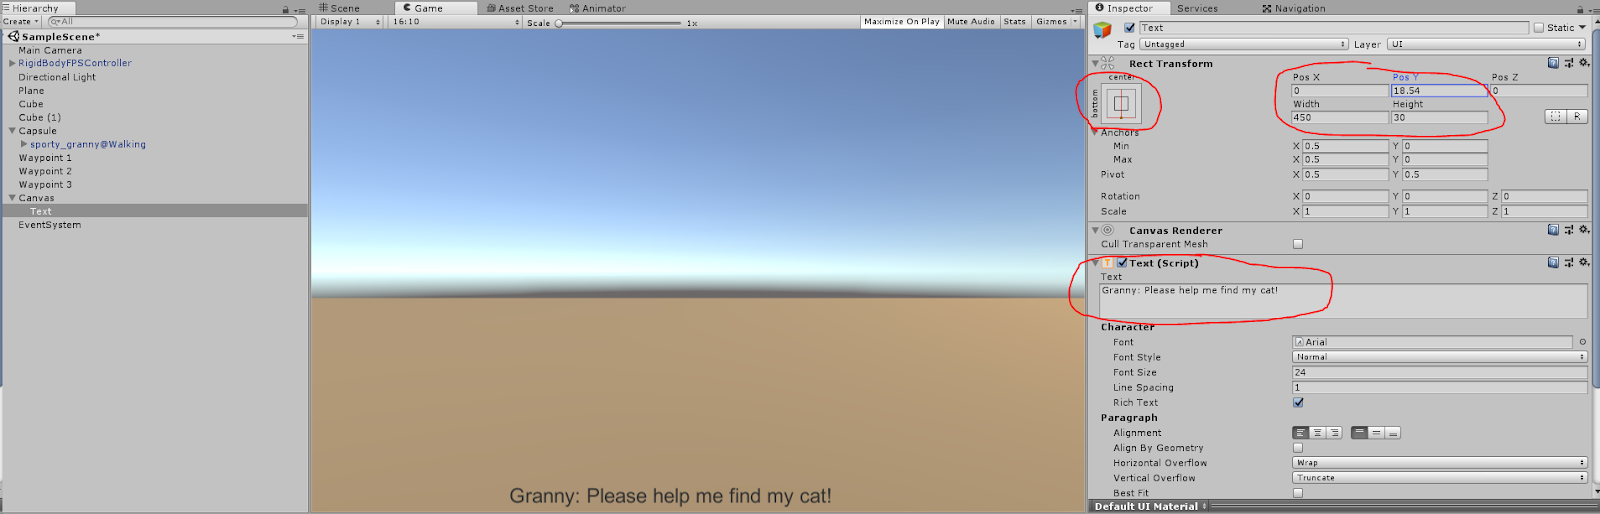
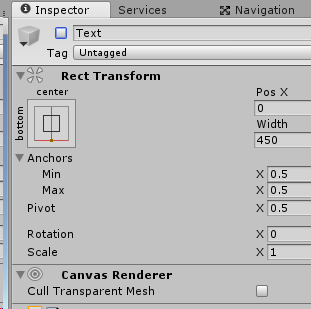
  11. Decide what your Quest Prompt should say, and remember to bind the text object’s Rect Transform to the bottom of the screen
  12. Disable the text object by default, we will toggle it on from the script
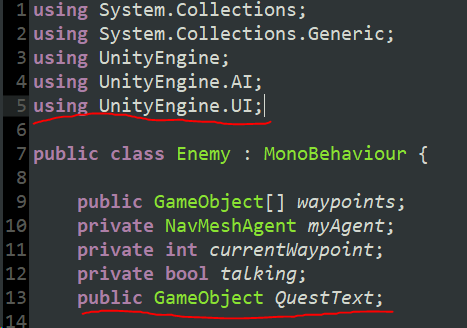
  13. Add using UnityEngine.UI to the top of the script and make a public GameObject for the quest text
  14. Set the QuestText true and false in the appropriate places
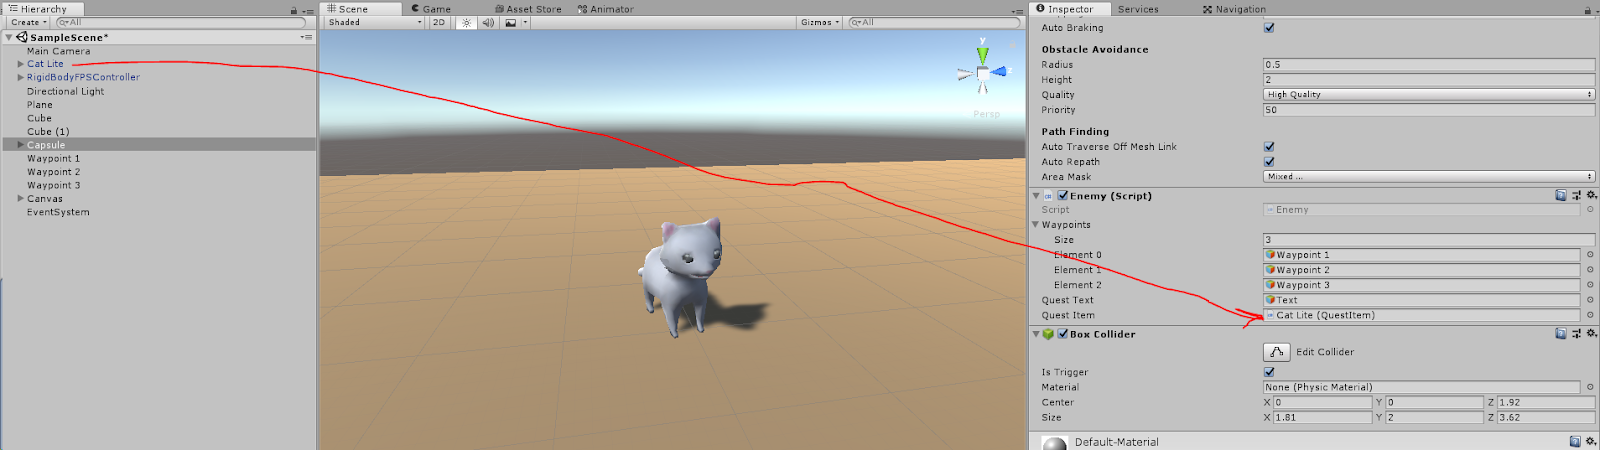
  15. Drag the QuestText to the empty GameObject slot on your character
  16. Be sure to test!
Quest Items and Activating the Quest
  1. Create a new C# script for the Quest Item (QuestItem.cs)
  2. Find a model to use as the Quest Item and give it a BoxCollider marked as IsTrigger, be sure the collider goes around the entire object
  3. Attach the QuestItem script to the object
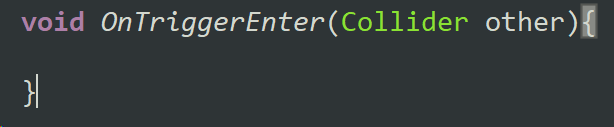
  4. In the QuestItem script, add the OnTriggerEnter function
  5. Create a public bool to keep track if the player has collected the item
  6. If the colliding object is the player, set that tracking bool to true
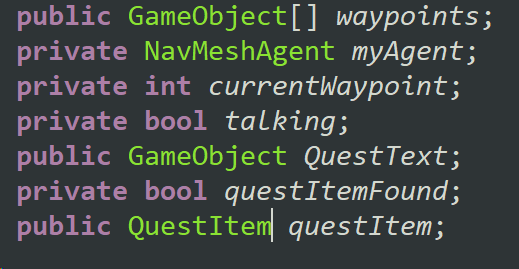
  7. Back in the character’s script, we need a bool to keep track if the quest item was found
  8. And we need a public QuestItem to link to the quest item object in the scene
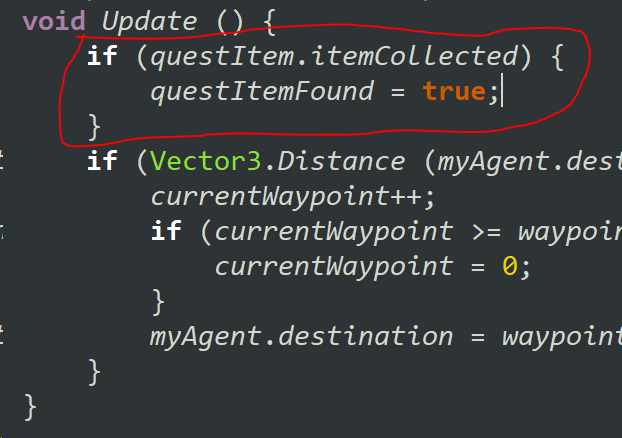
  9. In the character’s Update function, check to see if the quest item was collected
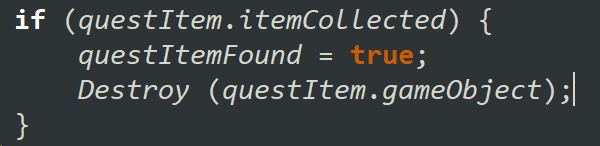
  10. If it was collected, we want to destroy it
  11. And we only want to run this check until it has been found, otherwise this check will throw an error after the object is destroyed
  12. Be sure to link the Quest Item to the public slot on the character’s script
  13. At this point if you test, the Quest Item should disappear when you collide with it
  14. We should also add a public bool in the character’s script to activate the quest after the player talks to her
  15. Activate the quest when the player talks to her
  16. In the QuestItem script, we need a public reference to the character’s script (in this case I left it called Enemy.cs from the previous tutorial, even though it is now used as an NPC)
  17. Before collecting the item, check if the questGiver’s quest is active
  18. Remember to link the character to the QuestGiver slot in the scene
  19. Now the cat can only be collected after the quest has been activated by talking to the granny
Completing the Quest
  1. We need to add a new section to the talking portion of the character’s script to change the text if the Quest Item was found
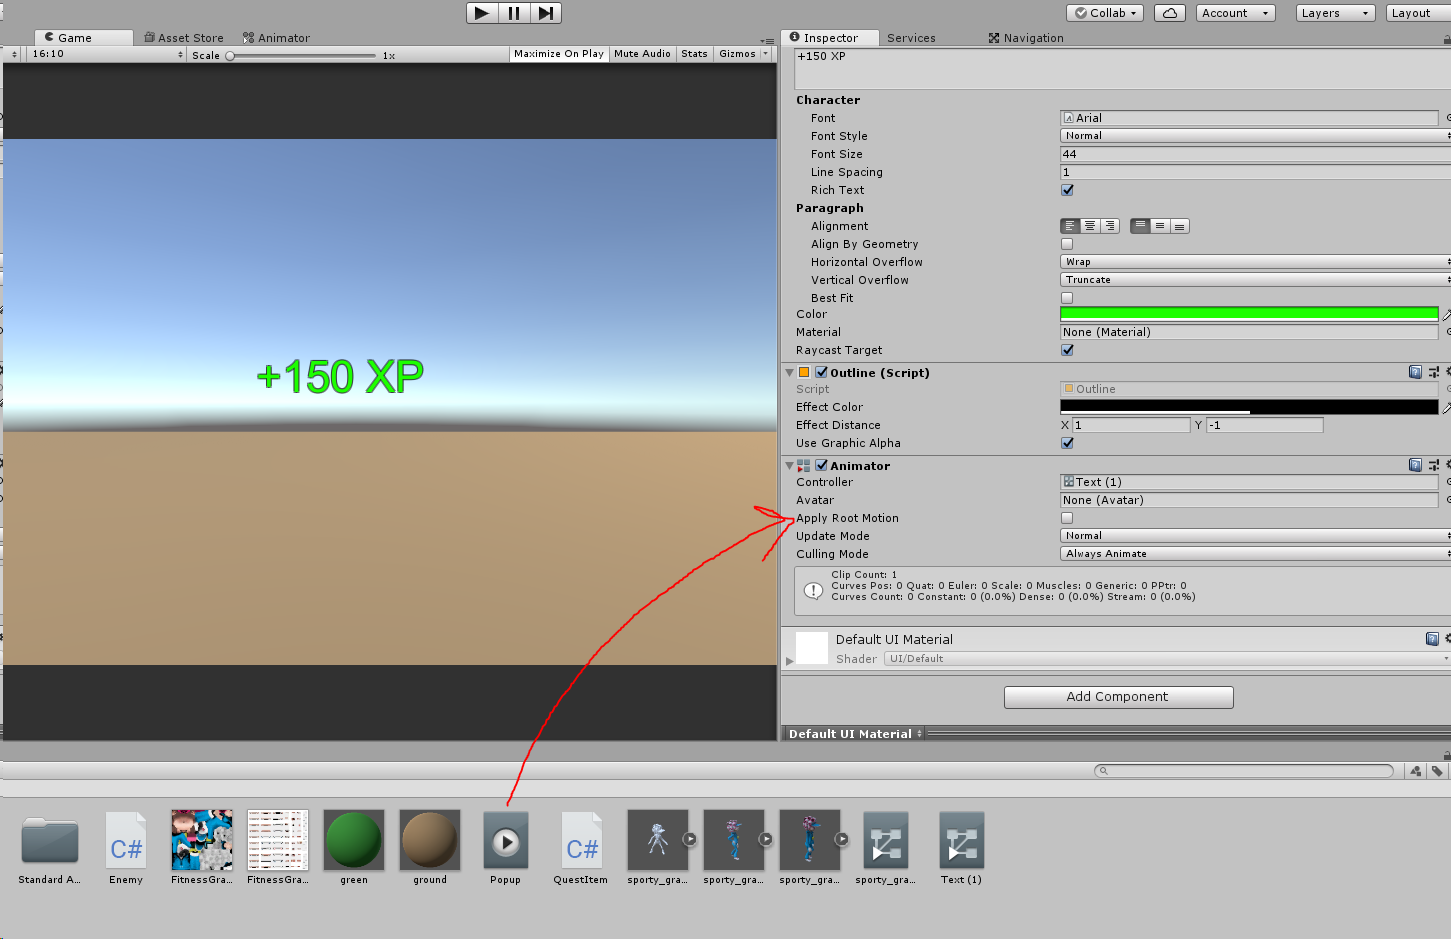
  2. Now to reward the player for completing the quest. Create a new Text object to show the reward, in this case I’m going to give the player XP
  3. We want this text to be large, bright, and eye-catching
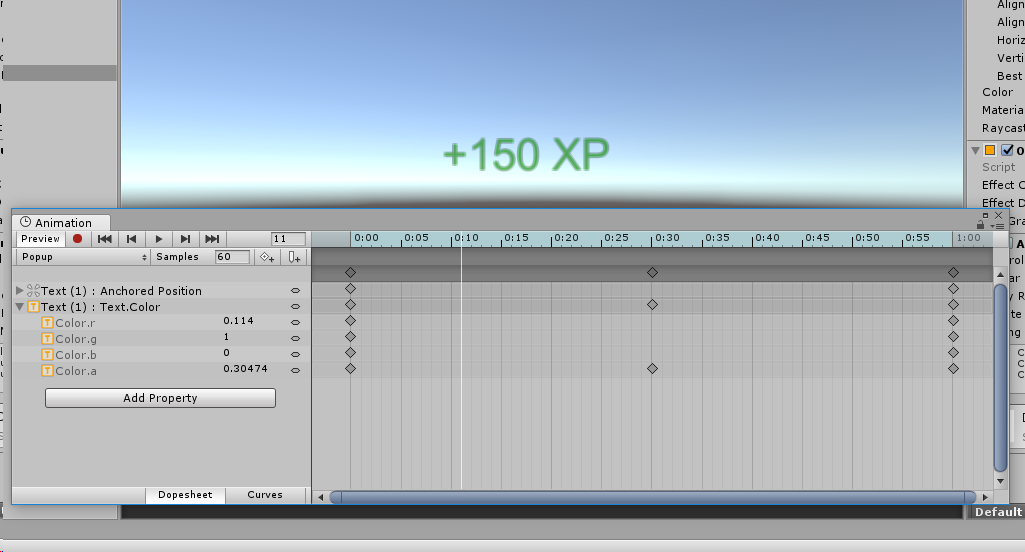
  4. Let’s create an Animation to make the text popup more exciting
  5. Attache the new animation to the Text Object
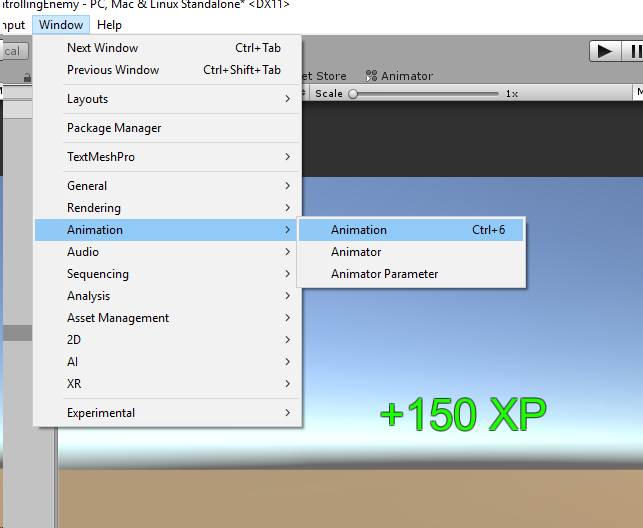
  6. Open the Animation window
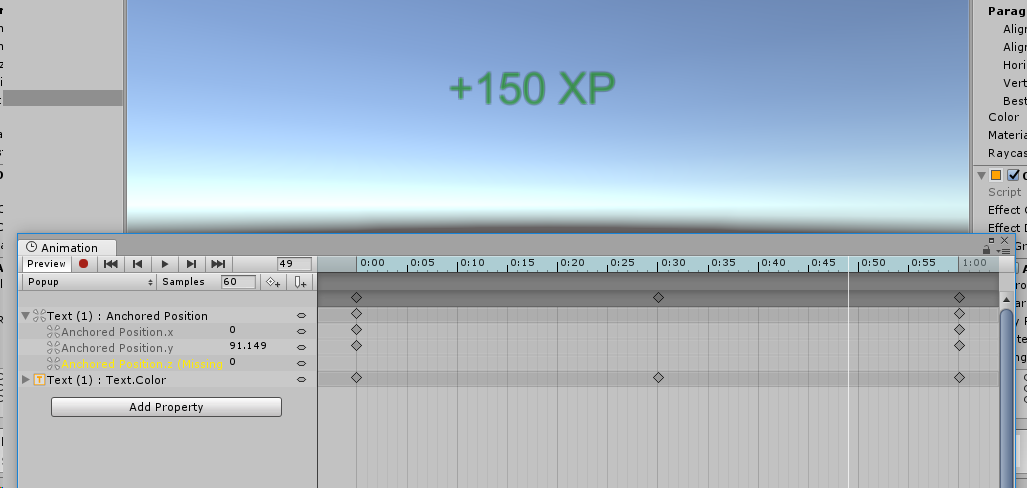
  7. Make sure you have the text selected, then Add Property for the Text.Color and Anchored Position
  8. Give it an Alpha of 0 for the start and end keyframe, and Alpha of 1 for a keyframe in the middle, so it fades in and out
  9. Set the Y value higher in the last keyframe so the test floats upward
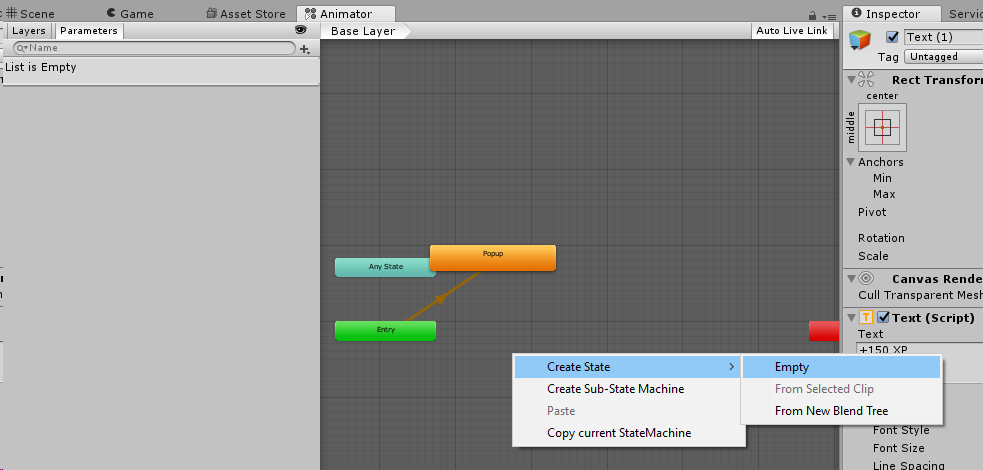
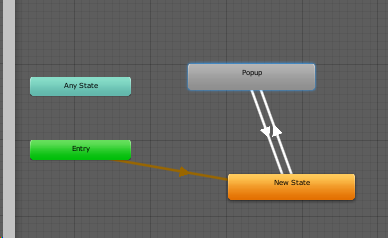
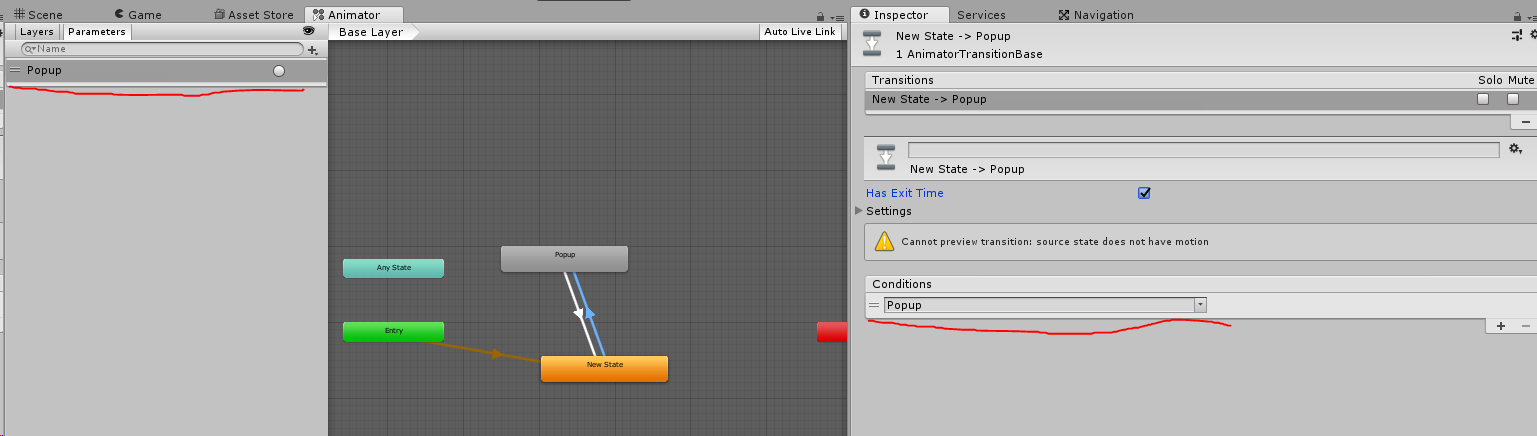
  10. Now we need to trigger the animation. In the Animator window, create an Empty State
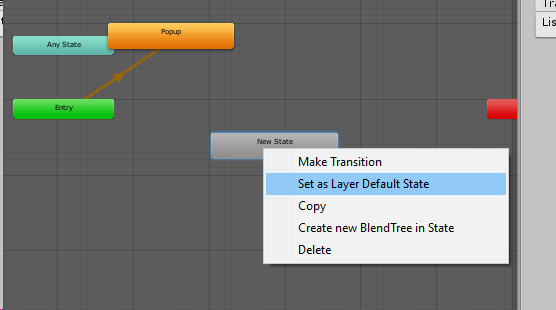
  11. Set that as the Layer Default State
  12. Make a transition to and from the Popup animation
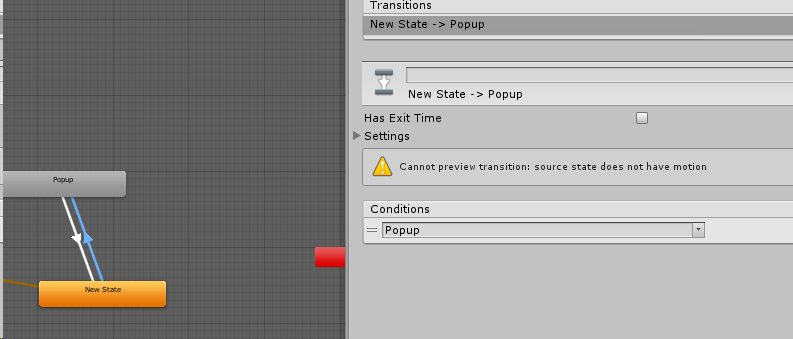
  13. Make a new Trigger in the Parameters tab and use that as the Condition to transition to the Popup animation
  14. Remember to uncheck the box for Has Exit Time
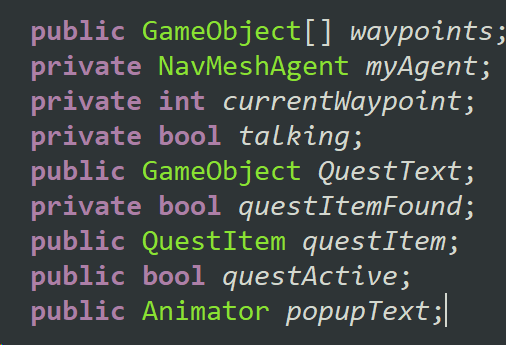
  15. Back in the character’s script, add a new public Animator to reference the popup text in the scene
  16. In the quest completion part of the script, trigger the animation
  17. Remember to drag the text into the public slot you created
  18. Set the starting Alpha for the text to 0 so it is not visible from the beginning
Summary
You should now have a quest giver that requests a specific item, the ability to go and collect that item, and a reward when you return to the quest giver. This can easily be expanded for a quest giver to ask for a certain number of things like “collect 50 gems” or “kill 10 enemies”

Friday, October 5, 2018

The Making of Cosmos Arena


Cosmos Arena is a local multiplayer party game for up to 4 players. Right now it is PC only but we hope to make an XBox port as well.


I'd like to share with you the story of how Cosmos Arena came to be.

Getting Started

My team started working on this project in 2016 when I was still working a full time job in AAA. I launched my studio Astire Games and brought on some contractors, most of whom were also working day jobs, so we were moonlighting to get to the first prototype.

First Prototype

In this prototype we started on the core mechanics - character movement and traps

At some point I realized that AAA work was not satisfying my drive as a developer, and working nights and weekends on Cosmos Arena wasn't enough for me. On top of working AAA and moonlighting, I was also teaching Game Design as an adjunct faculty.

Leaving a comfortable day job for a side project is a risky move, and I don't think I would have done it if not for the teaching gig. I was pretty confident I could live on my teaching income for at least a few months, so I decided to take the leap and I left AAA to go indie.


Funding

Anyone who has tried to get a project up off the ground knows that it takes money. Even if you are the only one working on the project, you at least need enough for yourself to live on, but if you plan on having other people work on the project then you need a starting fund.

I was teaching 8 hours a week, and I figured if I really stretched I could live on that income. But I also wanted to have other people working on this project...There wasn't a particular skillset I was looking for since it was all prototyping at that point, but working alone can be lonely and it can be hard to stay motivated. So I found some friends who were looking for a side project who were willing to work on the cheap, and I dug into my savings from my time working in AAA.

In a lot of ways I got really lucky - I have some very talented and supportive friends with a wide range of skills, and it wasn't long at all before we had a second prototype with character animations, obstacles, sound effects, and a start screen.

Second Prototype


Contract Work

Self-funding Cosmos Arena had a limited lifespan, which I knew going in. I had hoped to get the prototype to a point where I could start soliciting outside funding.

This is where my luck started to run out...I had basically no idea how to get funding for a project. I tried looking for potential publishers, but the prototype was just not ready to meet those expectations. On top of that, I hadn't been able to find an environment artist, and the character artist and one of the programmers were leaving for new full time jobs.

I managed to rough out the scene with some placeholder art from the Unity Asset Store, but it still needed a lot of work and I was running out of money and people.

First Art Style


Around this time I decided I either needed to get a job, or find some contract work for my team. As it happened, a contract project kind of fell into my lap. I had a programmer and a sound designer still on my team, and I was contacted by a couple who had a vision for a children's app and a budget for development. They already had some art made for it, so I jumped at the opportunity.

Contract work was great, it allowed me to keep my team together and add some new folks, and it added to the company bank account. But it was time-consuming, and it pretty much put Cosmos Arena on the back burner for several months.

Showcasing

At a couple of different times, we had an opportunity to showcase Cosmos Arena at local events. These opportunities were fantastic for getting me motivated to dive back into the project - usually there would be about 2 weeks to a month where I knew the game would be showcased and I wanted it to have something new to show, so there would be a hard push to get in new content and new features.

Showcase Build


Our showcase opportunities included the Intel Buzz Workshop at the Austin Games Conference, the Intel Indie Lounge at the Game Developers Conference, the Austin Game Dev booth at SXSW, and the IGDA booth at Dreamhack.

Second Showcase Build


Interns

Due to the sporadic nature of development on this project, all of the original team moved on to other things at various points during this timeline. Still on a tight budget, I decided to leverage my position teaching to find rising new talent looking for opportunities.

Initially I started taking interns at my company and letting them work on their own projects, which I then helped them publish. Finally I decided I had found the right interns for Cosmos Arena, so I offered them paid contract internships to spend the summer building levels.

Bringing on interns also coincided with finally having an artist to set the art direction of the project.

New Art Style and Levels


Art Direction and Iteration

There has been a lot of iteration and changes to the art style over the past two years, but honestly most of that iteration happened in the last 3 months. Here is a glimpse of some of that iteration...


Game Mechanics and Iteration

Not only did the art style change dramatically over time, also our core mechanics and design have changed. We've added new win conditions for different levels, replaced a health/damage system with a shield and one-hit-kill, we added a ghost mode when a player dies so they can take revenge on their killer, and we've incorporated building and planting to offset the killing and destroying.

Development


Alpha Release

We just hit our Alpha milestone and decided to make the game available for free for a limited time while we work through some bugs and collect feedback. If you've enjoyed learning about our development process, we would love for you to try the game and give us your feedback :)


Thanks for reading and thanks for playing!