This is an intermediate course for developers who have some experience with Unity and are ready to start building systems. If you are new to Unity, I recommend starting with my Game Prototyping in Unity blog series.
The Prototyping Game Systems course covers:
- Understanding the Design-Prototype Relationship
- Building a Prototype Play Space
- Prototyping Non-Combat Systems
- Adding Juicy Interactions
- Playtesting and Iterating Based on Feedback
Let's get started with the Design-Prototype Relationship.
Prototype is a broad term that is used in many industries to describe an early sample of a product used to test a concept or process. Within the game industry, we typically use prototype to describe a playable game concept that was created quickly to test new ideas. It’s important to note that nowhere in this definition does it say this needs to be created in a game engine, or even on a computer. The purpose of the prototype is to test an idea, and often the first test should be on paper.
You might hear game developers refer to a paper prototype, which is a playable game concept created on paper or using physical objects like cards, dice, or game pieces. Basically anything you can use to test your idea without doing any coding or creating any digital content. Paper prototyping is very useful at the start of a project when you’re not really sure what you’re making and you don’t have any scripts or art assets to work with. This course specifically focuses on digital prototypes because it is working within the framework of an in-progress game, so there are already some art assets and scripts to work with.
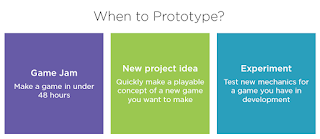
The three most common/useful times to prototype are during a Game Jam; when starting a new project; or when experimenting with new systems or mechanics for an existing project. This course covers the third option, creating and testing new systems within an existing project. Many aspiring game developers get their start working on games from scratch, either with student projects or side projects they take up on their own. Being able to integrate your work into an existing project is a major turning point for new developers, and one of the most desirable skills in a new entry-level hire.
So now we know when to prototype, but what are we prototyping? Generally we prototype Game Mechanics, or Game Systems which are collections of mechanics that work together. What is a Game Mechanic? Game mechanics are the rules that determine how the game functions, how the user interacts with the game, and how the game responds to the user.
A very simple example of a mechanic might be to click on an item to pick it up. Generally when you start to explain a mechanic, it will lead to questions which will help you work out the related mechanics. In this example my first question would be "What happens when I pick up an item? Does it go into my inventory? Do I hold it in my hands? Can I use it? Do I craft things with it?" And as you start answering those questions you’ll start to define your other mechanics.
Now that we understand mechanics, let's talk about another common phrase in prototyping: Rapid Prototyping
Rapid Prototyping is the process of quickly creating, testing, and iterating on prototypes. The first key here is speed, you want to find a testable solution as quickly as possible. You also want to have a clear direction so that you know what you are working towards and keep your goals in focus. And it is important to critically review everything you make during this process, you want to test everything, don’t be afraid of failure.
The first part of the prototyping process involves assessing the design needs. Generally when you join an existing project there is a design document in place.
The design document is full of useful information about the game, but it can be daunting and difficult to tell what is important and specific to the systems you are prototyping.
Since this course focuses on prototyping the non-combat systems of the game, the most useful information to us is anything related to digging/looting and upgrading the tools and weapons.
While assessing the design needs, it is important to keep the project resources in mind.
Pretty much every game being developed has a limited amount of time, money, and people. Understanding the available resources is an important part of prototyping.
In Part 2 we will dive into the game engine to build a Prototype Play Space.
If you enjoyed this blog and want to learn more about these topics and follow along with hands-on examples, please check out my full course on Pluralsight - Prototyping Game Systems for Swords and Shovels.
Thanks for reading!


